Easy Mini Cannoli Cups-Irresistible Italian Treats
Mini Cannoli Cups are about to become your new obsession! Who can resist the allure of those crisp, golden shells filled with a sweet, creamy ricotta filling? I know I can’t! For years, I’ve dreamt of recreating that iconic Sicilian treat at home, but the thought of frying cannoli shells always felt a bit daunting. That’s why I’m so thrilled to share this simplified recipe for Mini Cannoli Cups. It captures all the deliciousness of traditional cannoli without the fuss, making them perfect for parties, desserts, or just a delightful afternoon treat. What makes these truly special is the perfect balance: the satisfying crunch of the miniature pastry cups against the cool, luscious filling, often enhanced with delicate hints of citrus or chocolate chips. Get ready to wow your friends and family with these delightful, bite-sized pieces of heaven!

Mini Cannoli Cups
Forget the fuss of rolling and frying cannoli shells! These mini cannoli cups are a delightful shortcut to that classic Italian dessert. Using pre-made pie crusts, we can create adorable, edible cups that are perfect for holding a luscious, creamy ricotta filling. They’re simple enough for a weeknight treat but impressive enough for any gathering. The crunch of the baked pie crust combined with the sweet, cool filling and a hint of citrus is pure bliss. Let’s get started!
Ingredients:
Making the Creamy Ricotta Filling
The heart of any cannoli is its filling, and ours is wonderfully simple yet decadent. The key here is to ensure your ricotta is well-drained. This will prevent a watery filling. You can drain it by placing it in a fine-mesh sieve set over a bowl for at least 30 minutes, or even better, overnight in the refrigerator. This step makes a world of difference in the final texture.
In a medium bowl, combine the drained whole-milk ricotta cheese. Add the 1/2 cup of powdered sugar and the 2 tablespoons of granulated sugar. The combination of powdered and granulated sugar gives us a delightful texture – the powdered sugar smooths everything out, while the granulated sugar adds a subtle graininess that’s reminiscent of traditional cannoli. Next, stir in the finely grated orange or lemon zest. I personally love the bright, aromatic punch of orange zest, but lemon is equally fantastic. Finally, add the 1/2 teaspoon of vanilla extract for that classic sweet aroma and flavor.
Using a whisk or an electric mixer on low speed, whip the ingredients together until the filling is smooth and creamy. Be careful not to overmix, as this can sometimes lead to a grainy texture. You’re looking for a light, airy consistency that holds its shape. Once combined, taste and adjust sweetness if needed, though this amount is usually perfect. Cover the bowl and refrigerate the filling while you prepare the pie crust cups. This allows the flavors to meld beautifully.
Creating the Edible Pie Crust Cups
Now for the “cups” themselves! This is where our refrigerated pie crusts come in. Make sure they are softened according to the package directions – this makes them pliable and easier to work with.
Preheat your oven to 375°F (190°C).
Unroll one of the softened pie crusts onto a clean, lightly floured surface. Using a round cookie cutter or the rim of a glass that’s slightly larger than the cavities of your muffin tin (about 3-4 inches in diameter), cut out as many circles as you can from the crust. You should aim for about 6-8 circles per crust, depending on your cutter size. Gently press each circle into the individual cups of a standard muffin tin. You want the crust to gently conform to the shape of the tin, creating a cup-like structure. Don’t stretch the dough too much, as this can cause it to shrink and tear during baking. If the dough tears slightly, you can gently press it back together. Repeat this process with the second pie crust until you have enough cups to hold your filling, or until you run out of dough.
In a small bowl, combine the 3 tablespoons of turbinado sugar (also known as raw sugar) and the 1 teaspoon of ground cinnamon. This mixture will be sprinkled over the pie crust cups before baking, giving them a wonderful sweet and slightly spiced crunch. It also gives them a beautiful golden-brown hue.
Baking and Assembling Your Mini Cannoli Cups
Once your pie crusts are nestled into the muffin tin and you have your cinnamon-sugar mixture ready, it’s time to bake.
Sprinkle the turbinado sugar and cinnamon mixture evenly over the bottom and slightly up the sides of each pie crust cup. This caramelizes as it bakes, adding a delightful crunch and flavor.
Place the muffin tin in the preheated oven and bake for 12-15 minutes, or until the pie crusts are golden brown and puffed up. Keep a close eye on them, as pie crust can burn quickly. Once they’re golden, carefully remove the muffin tin from the oven.
Immediately after removing them from the oven, while the crusts are still warm and slightly pliable, you can gently press down the centers of the cups with the back of a spoon or a small rolling pin. This will create a more defined cup shape and prevent the centers from puffing up too much. If you notice any edges that are too high or uneven, you can carefully trim them with a sharp knife once they’ve cooled slightly.
Let the pie crust cups cool in the muffin tin for about 10 minutes before carefully transferring them to a wire rack to cool completely. This is crucial – trying to fill warm cups will result in the filling melting. You want them completely cool to the touch before proceeding.
Once your mini cannoli cups are completely cool, it’s time for the best part: filling them! Spoon or pipe the chilled ricotta filling into each cooled pie crust cup. Don’t overfill them; you want the filling to be nestled within the crust.
Finally, garnish your mini cannoli cups. Sprinkle the tops with additional powdered sugar for that classic cannoli look. You can also add the miniature semisweet chocolate chips or finely chopped pistachios to the top of the filling for an extra touch of texture and flavor. These are best served the same day they are filled for optimal crispness of the crust. Enjoy your delightful homemade mini cannoli cups!
Conclusion:
I hope you’ve enjoyed learning how to create these delightful mini cannoli cups! This recipe is truly a winner because it offers all the classic, irresistible flavors of traditional cannoli – the crisp, sweet shell and the creamy, rich ricotta filling – but in a convenient, bite-sized package. They are perfect for parties, dessert buffets, or just a special treat to brighten your day. You can serve them as is, dusted with a touch of powdered sugar, or get creative with toppings. Consider a drizzle of chocolate ganache, a sprinkle of chopped pistachios, or even some fresh berries for a burst of color and freshness. Don’t be afraid to experiment with the filling, too! A touch of lemon zest or a hint of orange extract can add a lovely aromatic dimension. I truly encourage you to give these mini cannoli cups a try. They are surprisingly simple to make and the reward of enjoying these homemade treasures is immense. Happy baking!
Frequently Asked Questions:
Can I make the cannoli shells ahead of time?
Yes, you absolutely can! Once cooled, store the baked shells in an airtight container at room temperature for up to a week. This makes assembly on the day of serving much quicker and easier.
How should I store the filled mini cannoli cups?
For the best texture, it’s best to fill your mini cannoli cups just before serving. If you need to store them, keep them in an airtight container in the refrigerator for no more than a day. The shells will soften slightly the longer they are filled.
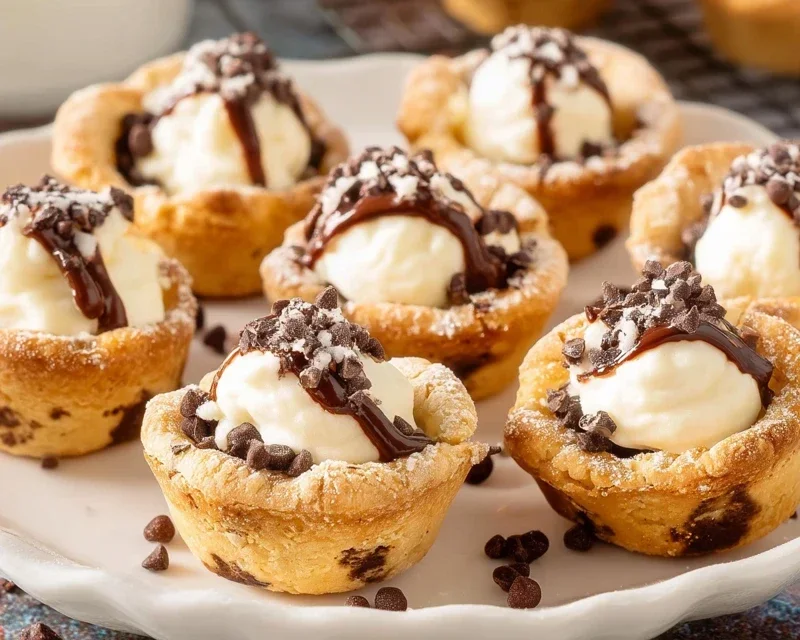
Mini Cannoli Cups
Delightful mini cannoli cups featuring a creamy ricotta filling encased in a crisp, spiced pie crust.
Ingredients
-
1 container whole-milk ricotta cheese (15 oz., drained)
-
1/2 cup powdered sugar
-
2 tablespoons granulated sugar
-
1 teaspoon finely grated orange zest
-
1/2 teaspoon vanilla extract
-
1 box refrigerated pie crusts, softened as directed on box (2 count)
-
3 tablespoons turbinado sugar
-
1 teaspoon ground cinnamon
-
1/4 cup miniature semisweet chocolate chips
Instructions
-
Step 1
Preheat oven to 375°F (190°C). -
Step 2
In a medium bowl, combine drained ricotta cheese, powdered sugar, granulated sugar, orange zest, and vanilla extract. Mix until smooth and well combined. -
Step 3
Unroll pie crusts and cut each into 12 rounds using a 3-inch round cookie cutter. Press each round into the cups of a mini muffin tin, forming a shell. -
Step 4
Bake for 10-12 minutes, or until golden brown and crisp. Let cool slightly in the tin before transferring to a wire rack to cool completely. -
Step 5
In a small bowl, combine turbinado sugar and ground cinnamon. Mix well. -
Step 6
Once pastry shells are completely cool, spoon or pipe the ricotta filling into each cup. Sprinkle with the turbinado sugar and cinnamon mixture. -
Step 7
Garnish with miniature chocolate chips or finely chopped pistachios and a dusting of additional powdered sugar before serving.
Important Information
Nutrition Facts (Per Serving)
It is important to consider this information as approximate and not to use it as definitive health advice.
Allergy Information
Please check ingredients for potential allergens and consult a health professional if in doubt.