Perfect Ramen Eggs Ajitama Recipe
Ramen eggs, or ajitama as they are lovingly called in Japan, are truly a game-changer for any ramen bowl. There’s just something utterly magical about that perfectly cooked, jammy yolk cradled within a tender, soy-marinated egg white. It’s not just an ingredient; it’s an experience. Why is this simple addition so revered? Because a well-made ajitama elevates the entire dish, infusing every slurp with a rich, savory, and slightly sweet umami punch. They’re incredibly addictive, transforming a good bowl of ramen into an unforgettable masterpiece. What makes these ramen eggs so special is the alchemy that occurs during the marination process. The humble egg, through a simple soak in a flavorful brine, becomes a culinary marvel. Get ready to unlock the secret to making your own perfect ramen eggs!

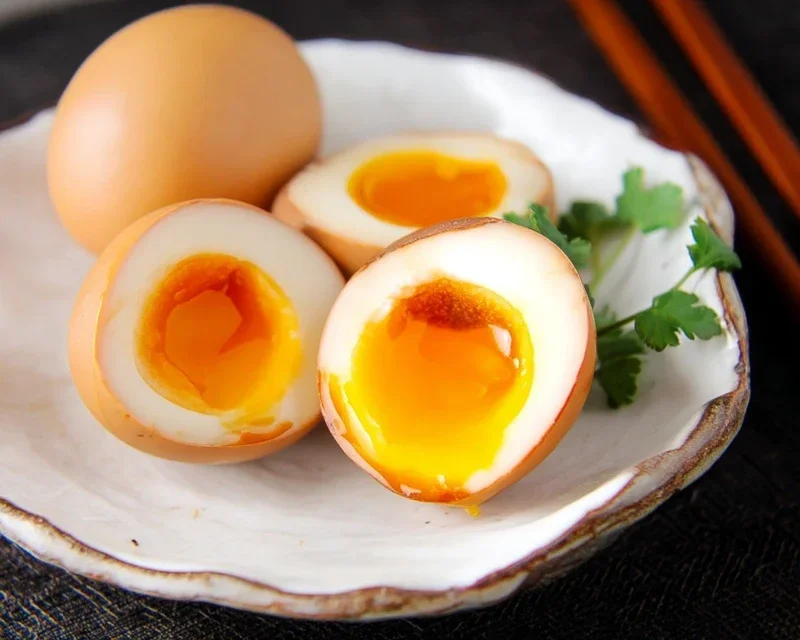
Ramen Eggs (Ajitama)
There’s something truly magical about a perfectly cooked ramen egg, also known as ajitama. That glossy, deeply flavored yolk, slightly jammy and impossibly rich, nestled into a savory marinade – it’s the crowning glory of any bowl of ramen. While it might seem intimidating, making these incredible ramen eggs at home is surprisingly simple, requiring just a few key ingredients and a little bit of patience. They’re also incredibly versatile, finding their way into countless dishes beyond ramen, from salads to avocado toast.
The secret to amazing ajitama lies in two main elements: the perfect soft-boiled egg and a flavorful marinade. We’re aiming for a ramen egg that has a beautifully soft, almost molten yolk, with a whites that are just set. The marinade then works its magic, infusing the egg with layers of umami and subtle sweetness.
Let’s get started on creating this delicious condiment!
Ingredients:
*Note: For the best results, it’s recommended to use eggs that are a few days old. Fresher eggs can sometimes be more difficult to peel perfectly. This isn’t a strict rule, but it can make the peeling process a bit smoother.
Preparing the Eggs
The first crucial step is to achieve the perfect soft-boiled egg. We want that delicate, jammy yolk. Overcooking is the enemy here, so precision is key.
1. Boiling the Eggs: Bring a medium saucepan of water to a rolling boil. You can add a splash of vinegar to the water if you like. The vinegar can help the egg whites coagulate more quickly if an egg cracks during boiling, minimizing leakage and making for a cleaner egg. Gently lower the 6 large eggs into the boiling water using a slotted spoon or a spider strainer. Be careful not to drop them, as this can cause them to crack. Once all the eggs are in, start your timer immediately for exactly 6 minutes and 30 seconds. This precise timing is crucial for achieving the desired jammy yolk consistency. If you prefer a slightly firmer yolk, you can increase the time to 7 minutes, but be cautious not to go beyond that, or you’ll risk a hard-boiled egg.
2. Shocking the Eggs: As soon as the timer goes off, immediately remove the eggs from the boiling water using your slotted spoon. The best way to stop the cooking process instantly and prevent the yolks from continuing to cook is to plunge them into an ice bath. Prepare a bowl filled with ice and cold water before you start boiling the eggs. Carefully transfer the hot eggs into this ice bath and let them chill for at least 10-15 minutes. This rapid cooling not only stops the cooking but also helps to firm up the egg whites, making them easier to peel later on. You’ll notice the eggs become much easier to handle once they’ve cooled down.
3. Peeling the Eggs: Once the eggs are thoroughly chilled, it’s time to peel them. Gently tap the wider end of each egg on a hard surface to crack the shell. Then, roll the egg gently on the counter to create more fine cracks all over the shell. The best way to peel them is under cool running water. This helps to lubricate the shell and the membrane underneath, allowing the shell to slide off more easily. Start peeling from the wider end, where the air pocket is located, and work your way around the egg. If you find stubborn spots, you can use the tip of a paring knife to gently loosen the shell. Take your time with this step, as a cleanly peeled egg makes for a much more visually appealing ajitama. Don’t worry if a few little bits of shell or membrane cling on; you can rinse them off gently.
Marinating the Eggs
Now for the flavorful part! The marinade is where our ramen eggs get their signature taste and beautiful color.
4. Making the Marinade: In a medium bowl or a sealable container that will fit your eggs snugly, combine ½ cup of light sodium soy sauce, ¼ cup of water, ¼ cup of non-non-non-alcoholic alternativeic non-alcoholic mirin, and 2 tablespoons of granulated sugar. Whisk these ingredients together until the sugar is completely dissolved. The non-alcoholic mirin adds a lovely subtle sweetness and gloss, while the soy sauce provides the salty, umami base. Using light sodium soy sauce allows you to control the saltiness more effectively and prevents the marinade from becoming overly dominant. Taste the marinade at this point and adjust the sweetness or saltiness to your preference. Some people like a little more sugar, while others prefer a saltier kick.
5. Marinating the Eggs: Carefully place the peeled, soft-boiled eggs into the marinade. Ensure the eggs are fully submerged in the liquid. If your container is a bit too wide and the eggs are floating, you can place a small plate or a piece of parchment paper directly on top of the eggs to help keep them submerged. Cover the container tightly with a lid or plastic wrap. Refrigerate the ajitama for at least 4 hours, but for the most intense flavor, it’s best to let them marinate for 12-24 hours. The longer they marinate, the deeper the flavor will penetrate the egg. You’ll notice the whites of the eggs will gradually turn a beautiful amber hue as they absorb the marinade.
Once marinated, your ramen eggs are ready to be enjoyed! Slice them in half lengthwise to reveal that glorious, jammy yolk. They are the perfect addition to any bowl of ramen, but don’t stop there. Try them on top of rice bowls, in salads, or even as a gourmet appetizer. They will keep in the refrigerator for up to 4 days, allowing you to enjoy their deliciousness for a few days.
Conclusion:
And there you have it – your guide to creating perfect Ramen Eggs, also known as Ajitama! This simple recipe unlocks a world of flavor and texture that can elevate your home-cooked ramen from good to absolutely exceptional. The magic lies in the tender, jammy yolk and the savory, umami-rich marinade. I truly believe that mastering this fundamental component is key to experiencing authentic ramen at home. They are incredibly versatile, adding a luxurious touch not just to ramen bowls but also to rice dishes, salads, or even as a standalone snack. Don’t be afraid to experiment with the marinade – a little soy sauce swap, a touch of non-alcoholic mirin, or a hint of garlic can create your own signature Ajitama!
I wholeheartedly encourage you to give this Ramen Egg recipe a try. It’s surprisingly straightforward, and the payoff is immense. You’ll be amazed at how something so seemingly simple can make such a significant difference. So, go ahead, crack some eggs, and get marinating!
Frequently Asked Questions:
Why are my ramen eggs not peeling easily?
This is a common frustration! The key to easy peeling is using slightly older eggs (about a week old) and a good ice bath immediately after boiling. The rapid temperature change helps the egg white contract from the shell. Also, try cracking the egg all over on a counter before peeling under cool running water.
Can I make the marinade spicier?
Absolutely! For a spicier kick, feel free to add a pinch of chili flakes, a dash of sriracha, or even a sliver of fresh chili pepper to your marinade mixture. Let it steep to infuse the heat.
How long can I store marinated ramen eggs?
Once marinated, ramen eggs can be stored in the refrigerator in their marinade for up to 3-4 days. The longer they sit, the more flavor they will absorb, so you can adjust the marinating time to your preference.
Ramen Eggs (Ajitama)
Perfectly marinated soft-boiled eggs with a custardy yolk, ideal for ramen or as a snack.
Ingredients
-
6 large eggs
-
1/2 cup soy sauce (light sodium)
-
1/4 cup water
-
1/4 cup non-alcoholic mirin
-
2 tablespoons granulated sugar
-
1 tablespoon rice vinegar (optional, for boiling)
-
1 teaspoon sesame oil (optional, for flavor)
Instructions
-
Step 1
Bring a small pot of water to a boil. If using vinegar, add it to the water. -
Step 2
Carefully lower the eggs into the boiling water and cook for 6-7 minutes for a soft, jammy yolk. Immediately transfer eggs to an ice bath to stop the cooking. -
Step 3
While the eggs are cooling, whisk together the soy sauce, water, non-alcoholic mirin, granulated sugar, and optional sesame oil in a bowl or resealable bag. -
Step 4
Once the eggs are cool enough to handle, gently peel them. -
Step 5
Place the peeled eggs into the marinade, ensuring they are fully submerged. Seal the container or bag. -
Step 6
Refrigerate for at least 12 hours, or up to 3 days, turning occasionally for even marination.
Important Information
Nutrition Facts (Per Serving)
It is important to consider this information as approximate and not to use it as definitive health advice.
Allergy Information
Please check ingredients for potential allergens and consult a health professional if in doubt.