Easy 4th of July Snack Mix Recipe
The 4th of July Snack Mix is an absolute must-have for any celebration, and I’m so excited to share my favorite recipe with you! There’s just something magical about gathering with loved ones, watching fireworks paint the night sky, and having a bowl of this irresistible mix within easy reach. It’s more than just a collection of snacks; it’s a taste of nostalgia, a crunchy, salty, and sweet companion to all the festive fun. What makes this particular 4th of July Snack Mix so special is its perfect balance – it hits all the right notes without being overwhelming. Each handful promises a delightful surprise, combining familiar favorites with a hint of something new, making it the star of any picnic table or backyard barbecue. Get ready to wow your guests (and yourself!) with this crowd-pleasing concoction!
4th of July Snack Mix
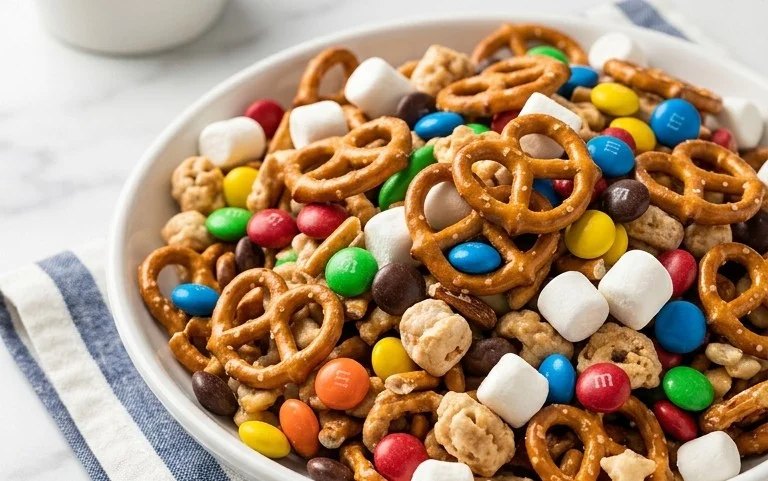
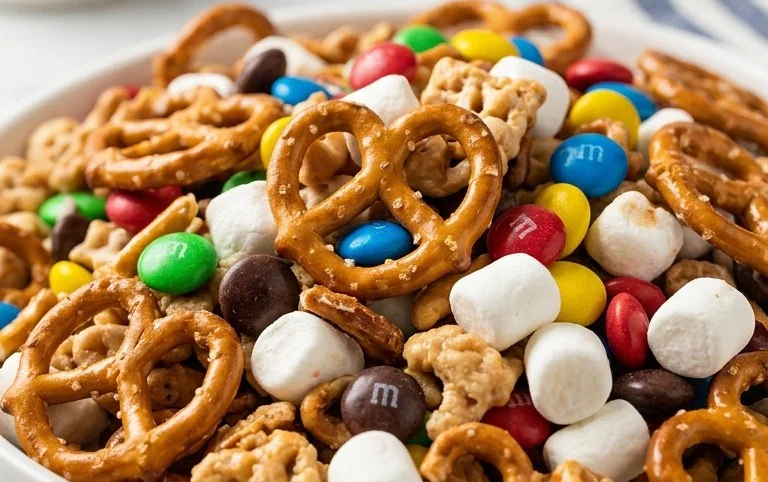
This 4th of July Snack Mix is the ultimate patriotic treat to fuel your celebrations! Imagin extracte a delightful crunch with bursts of sweet and salty, all in festive red, white, and blue hues. It’s incredibly easy to whip up and is sure to be a crowd-pleaser at any barbecue, picnic, or fireworks viewing party. This mix is perfect for little hands to grab and enjoy, and even better for us adults to sneak handfuls of while we mingle. The combination of crispy cereals, salty pretzels, sweet white chocolate, and colorful candies makes for a truly irresistible snack. Plus, it’s wonderfully customizable, allowing you to tailor it to your specific taste preferences. Let’s get started on this delicious journey!
Ingredients:
Preparing the Mix
Step 1: Combine the Dry Ingredients
The first step in creating this amazing snack mix is to gather all of your dry ingredients in a nice, large bowl. You’ll want a bowl that’s big enough to comfortably hold everything and allow for easy mixing without spillage. Start by adding the 2 cups of Chex cereal. I personally love using corn Chex for its slightly sweeter flavor, but rice Chex works just as well if that’s what you have on hand. Next, add in the 1 cup of mini pretzel twists. If you can’t find twists, don’t worry! Mini pretzel rods that you break into smaller pieces work perfectly too. The goal is to have bite-sized pieces that distribute evenly. Now, pour in the 2 cups of Cap’n Crunch cereal. Make sure it’s the origin extractal version without the berries, as we’re adding our own patriotic candy elements later. Finally, add the 2 cups of Honey Nut Cheerios. This cereal brings a lovely subtle sweetness and a familiar crunch that pairs beautifully with the other components. Give everything a gentle stir just to make sure the different cereals and pretzels are acquainted.
Step 2: Incorporate the Patriotic Candies and Sprinkles
Once your base of cereals and pretzels is mixed, it’s time to add the star of the show – the red, white, and blue M&M’s! Carefully pour in the 1 cup of these festive candies. If you’re a serious M&M’s fan, feel free to add a bit more; this mix is very forgiving! For an extra pop of color and texture, I love adding the optional 2 tablespoons of festive sprinkles at this stage. They might seem small, but they make a big difference in the visual appeal, making your snack mix truly scream “Fourth of July!” Gently fold these ingredients into the dry mix. Be careful not to crush the cereals too much; we want to maintain that satisfying crunch. Ensure the M&M’s and sprinkles are as evenly distributed as possible throughout the bowl. This is where the magic starts to happen, as the colors begin extract to create a vibrant and appetizing blend.
Melting the White Chocolate
Step 3: Melt the White Chocolate Chips
This is where we bring everything together with a luscious coating. You’ll need to melt your 1-1/2 bags (which is about 16 ounces or 2-3/4 cups) of white chocolate chips. The easiest and safest way to do this is in the microwave. Place the white chocolate chips in a microwave-safe bowl. Add the 1-1/2 teaspoons of coconut oil. The oil helps to make the chocolate smoother and easier to work with, preventing it from seizing up. Microwave the chips in 30-second intervals, stirring thoroughly after each interval. It’s crucial to stir well because white chocolate can burn easily if overheated. You’re looking for the chocolate to be mostly melted, with a few small lumps remaining. The residual heat will take care of those lumps as you stir. Alternatively, you can melt the chocolate using a double boiler method on the stovetop, which offers more control but requires a bit more attention.
Step 4: Coat the Snack Mix
Once your white chocolate is completely melted and smooth, it’s time to coat your prepared dry ingredients. Pour the melted white chocolate directly over the cereal, pretzel, and candy mixture in the large bowl. Using a large spatula or a wooden spoon, gently fold and stir the mixture until every piece is lightly coated with the luscious white chocolate. This step requires a bit of patience. You want to ensure that all the nooks and crannies of the cereals and pretzels are covered, but avoid over-mixing, which can break down the delicate components. The goal is a beautiful, glossy coating that will hold all the delicious elements together. Don’t be afraid to get in there and really make sure everything is coated – this is what provides that delightful sweetness and binds your mix.
Cooling and Finishing Touches
Step 5: Spread and Set
Now that your snack mix is beautifully coated, you need to spread it out to cool and set. Line a couple of large baking sheets with parchment paper or wax paper. This prevents the snack mix from sticking to the pans and makes for easy cleanup. Carefully spread the coated snack mix out onto the prepared baking sheets in a single layer. Try to break apart any large clumps as you spread. This will ensure that each piece is well-defined and gets nice and crisp as it cools. Place the baking sheets in the refrigerator for about 20-30 minutes, or until the white chocolate has hardened completely. Alternatively, you can let it set at room temperature, but it will take longer. Once the chocolate is firm, you can gently break apart any larger clusters that may have formed. This is the moment of truth, where your delicious 4th of July Snack Mix is ready to be enjoyed! Store any leftovers in an airtight container at room temperature.
Conclusion:
This 4th of July Snack Mix is an absolute winner for any celebration! It’s incredibly easy to assemble, requiring minimal effort for maximum crowd-pleasing impact. The delightful combination of salty, sweet, and crunchy textures makes it irresistible. Whether you’re hosting a backyard barbecue, heading to a fireworks display, or just enjoying a festive afternoon, this snack mix is the perfect companion. It’s a versatile treat that caters to a variety of tastes, ensuring everyone at your gathering will find something to love. I truly encourage you to give this 4th of July Snack Mix a try – it’s guaranteed to be a hit and a new go-to for your patriotic parties!
For serving, this mix shines in decorative bowls on your snack table, but it also travels beautifully in senon-alcoholic aled bags or containers for picnics and potlucks. Consider packagin extractg individual portions for party favors that guests can take home.
If you’re looking to switch things up, consider adding a dash of chili powder for a little heat, or incorporating some dried cranberries for a tart counterpoint. You could also experiment with different types of pretzels or candies to personalize it even further.
Frequently Asked Questions:
How can I store this 4th of July Snack Mix?
You can store your delicious 4th of July Snack Mix in an airtight container at room temperature for up to a week. This ensures it stays fresh and crunchy for your enjoyment throughout the holiday weekend.
Can I make this snack mix ahead of time?
Absolutely! This is a fantastic make-ahead recipe. In fact, I recommend preparing it a day or two in advance to allow the flavors to meld together beautifully. It will save you precious time on the day of your celebration.
Are there any nut-free variations for this recipe?
Yes, definitely! To create a nut-free version of this 4th of July Snack Mix, simply omit any ingredients containing nuts. You can easily substitute them with extra pretzels, popcorn, or even some gluten-free crackers for added texture and flavor.
4th of July Snack Mix
A festive and easy-to-make snack mix perfect for 4th of July celebrations. Combines crunchy cereals, pretzels, chocolate, and M&M’s for a sweet and salty treat.
Ingredients
-
2 cups Chex cereal (corn or rice)
-
1 cup mini pretzel twists
-
2 cups Cap’n Crunch cereal (without berries)
-
2 cups Honey Nut Cheerios cereal
-
1 cup red, white, and blue M&M’s
-
1-1/2 bags (16 ounces total) white chocolate chips
-
1-1/2 teaspoons coconut oil
-
2 tablespoons festive sprinkles (optional)
Instructions
-
Step 1
In a large bowl, combine the Chex cereal, mini pretzel twists, Cap’n Crunch cereal, and Honey Nut Cheerios cereal. Stir gently to combine. -
Step 2
In a microwave-safe bowl, combine the white chocolate chips and coconut oil. Microwave in 30-second intervals, stirring after each, until melted and smooth. -
Step 3
Pour the melted white chocolate mixture over the cereal and pretzel mixture in the large bowl. Stir carefully until everything is evenly coated. -
Step 4
Gently fold in the red, white, and blue M&M’s. If using, add the festive sprinkles at this stage and stir lightly. -
Step 5
Spread the snack mix onto a baking sheet lined with parchment paper to cool and harden completely. This will take about 10-15 minutes. -
Step 6
Once hardened, break up any large clumps and serve.
Important Information
Nutrition Facts (Per Serving)
It is important to consider this information as approximate and not to use it as definitive health advice.
Allergy Information
Please check ingredients for potential allergens and consult a health professional if in doubt.