Easy Japanese Tuna Onigiri Recipe Quick Make
15-min. Easy Japanese Tuna Onigiri are a true lifesaver, aren’t they? When hunger strikes and time is scarce, these delightful rice balls are my go-to solution for a quick, satisfying, and authentically Japanese snack or light meal. There’s something incredibly comforting and universally loved about the simple perfection of fluffy rice cradling a savory filling. What truly makes our 15-min. Easy Japanese Tuna Onigiri special is the effortless blend of creamy tuna, often mixed with Japanese mayonnaise and a hint of soy sauce, all encased in perfectly seasoned sushi rice. They’re incredibly versatile – perfect for a busy lunchbox, a post-workout refuel, or even a spontaneous appetizer when friends pop over. Get ready to master this wonderfully simple yet incredibly flavorful dish in no time!
Why You’ll Love This Recipe:
Quick and Effortless Preparation
Authentic Japanese Flavors
Highly Customizable
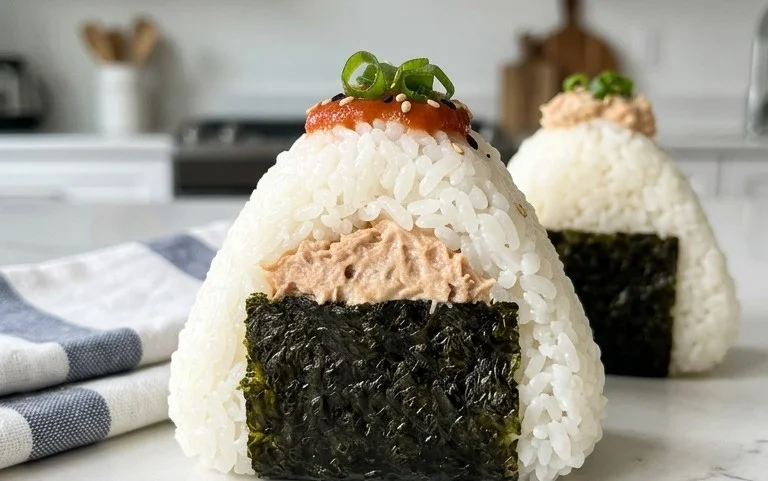
15-min. Easy Japanese Tuna Onigiri
Welcome to a recipe that’s going to revolutionize your busy week! These 15-minute Japanese Tuna Onigiri are not only incredibly quick to whip up, but they’re also wonderfully satisfying and packed with flavor. Perfect for a light lunch, a speedy snack, or even a quick breakfast when you’re on the go, onigiri are a staple in Japanese cuisine for a reason. Their simplicity belies their deliciousness, and this tuna-filled version is a classic for a good reason. We’re going to make them so easy, you’ll wonder why you haven’t made them before! The key is having your rice ready, and then it’s just a matter of a few simple steps to transform humble rice and tuna into these delightful little rice balls.
Ingredients:
Making Your Tuna Filling
This is where all the flavor magic happens! The combination of tuna and mayonnaise is a classic for a reason. It creates a creamy, savory filling that complements the plain rice perfectly.
1. Prepare the Tuna: Open your can of tuna. If you’re using tuna packed in oil, I recommend draining off most of the oil, but leaving just a little behind can add a nice richness to the filling. If you’re using tuna packed in water, drain it thoroughly. Place the drained tuna into a small bowl.
2. Combine with Mayo: Add the Japanese mayonnaise to the bowl with the tuna. Japanese mayonnaise has a slightly richer, tangier flavor than Western mayonnaise, which I find works wonderfully here. However, regular mayonnaise is perfectly acceptable if that’s what you have on hand. Stir the tuna and mayonnaise together until they are well combined and form a spreadable mixture. You want it to be creamy but not too wet. If it seems a bit dry, you can add another small drizzle of mayo. Taste this mixture – it should be seasoned and delicious on its own!
Assembling Your Onigiri
Now for the fun part – shaping these tasty treats! The key to handling the rice is to keep your hands slightly damp so the rice doesn’t stick.
3. Prepare Your Rice: Make sure your cooked short-grain rice is still warm or at room temperature. It’s much easier to shape warm rice than cold, hard rice. In a small bowl, mix the 1/2 teaspoon of salt with about 2 tablespoons of water. This salted water will be used to moisten your hands, which is crucial for preventing the rice from sticking. Have your nori sheets ready to go, and if you’re using sesame seeds for garnish, have those in a tiny dish as well.
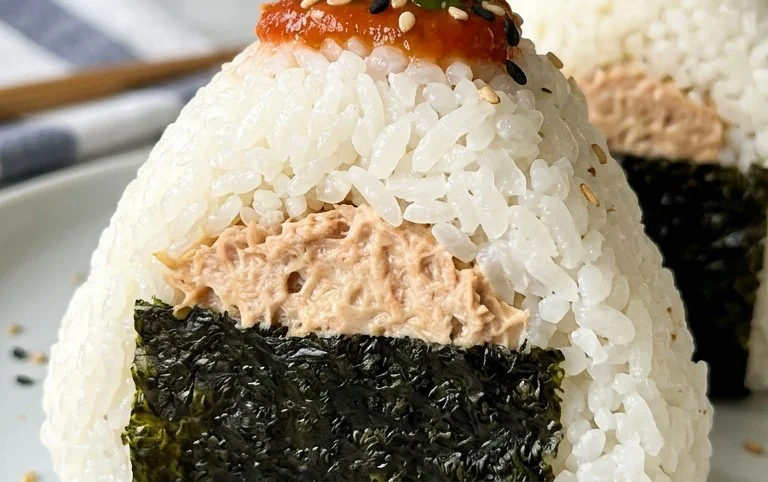
4. Shape the Onigiri: Dip your hands into the salted water and rub them together to moisten them. Take about 1/2 cup of rice and place it in the palm of one hand. Gently flatten the rice into a small disc. Make a small indentation in the center of the rice. Now, spoon about 1 to 2 tablespoons of your prepared tuna and mayonnaise mixture into this indentation. Don’t overfill it, or it will be difficult to seal. Carefully bring the edges of the rice up and around the filling, enclosing it completely. Gently cup your hands around the rice and begin extract to shape it. You can aim for a classic triangular shape, a round ball, or even a slightly flattened oval. The key is to press gently but firmly enough to form a compact ball that holds its shape. Repeat this process with the remaining rice and tuna filling.
5. Wrap and Garnish: Once you have shaped your onigiri, it’s time to add the nori and any optional garnishes. If you’re using full sheets of nori, you can cut them into strips or shapes that will wrap around the base or side of your onigiri. I find a strip about 2 inches wide and 4-5 inches long works well to wrap around the bottom half of a triangular onigiri. Gently press the nori onto the rice. If you’re using sesame seeds, sprinkle them onto the exposed parts of the rice for an extra touch of flavor and visual appeal. You can also press them gently into the surface of the rice. If you prefer less nori, you can simply use a small piece to hold the onigiri together or to add a decorative touch.
Notes on Freshly Cooked Rice:
If you are cooking your rice from scratch for this recipe, aim for about 1 cup of uncooked short-grain rice. Cook it according to your rice cooker’s instructions or on the stovetop. The key is to let it steam for about 10-15 minutes after cooking to achieve the perfect sticky texture. You’ll want to use it while it’s still warm for the best results when shaping your onigiri. If your rice has cooled down too much, you can gently reheat it in the microwave for a minute or two.
There you have it – delicious, homemade Japanese Tuna Onigiri in under 15 minutes! These are best enjoyed fresh, but they also keep well for a few hours if you need to make them ahead. Pack them in a bento box or a simple container for a satisfying and portable meal. Enjoy this taste of Japan, made with love and in record time!
Conclusion:
And there you have it – your super simple, incredibly delicious Japanese Tuna Onigiri, ready in just 15 minutes! This recipe truly shines because it’s so accessible, requiring minimal ingredients and prep time, making it perfect for busy weeknights, quick lunches, or even a satisfying snack. The combination of fluffy rice, savory tuna, and a hint of umami is incredibly satisfying and wonderfully customizable. I hope you feel inspired to whip up a batch of these yourself!
These onigiri are fantastic on their own, but they also make a wonderful addition to a bento box, served alongside a light miso soup, or even as a light appetizer. Don’t be afraid to get creative with your fillings! Consider adding a sprinkle of furikake for extra flavor, some finely chopped pickled gin extractger for a bit of tang, or even a dash of Japanese mayonnaise for a creamier texture.
I truly encourage you to give this 15-min. Easy Japanese Tuna Onigiri recipe a try. It’s a taste of Japan that’s so easy to bring into your own kitchen, and I’m confident you’ll love how quick, easy, and rewarding it is. Happy rice ball making!
Frequently Asked Questions:
Can I make the rice ahead of time?
Absolutely! You can cook your sushi rice a day in advance and store it in the refrigerator. When you’re ready to make your onigiri, simply warm the rice gently in the microwave or on the stovetop until it’s pliable enough to shape. This can save you even more time when you’re in a rush.
What other fillings can I use?
The possibilities are nearly endless! Besides tuna, popular fillings include seasoned salmon, teriyaki chicken, seasoned kombu (kelp), or even umeboshi (pickled plum). You can also mix in chopped scallions, sesame seeds, or a tiny bit of wasabi for a little kick.
15-min. Easy Japanese Tuna Onigiri
Quick and simple Japanese rice balls filled with seasoned tuna and mayonnaise. Perfect for a light meal or snack.
Ingredients
-
2 sheets nori
-
1 tsp sesame seeds
-
2 cups cooked short grain rice
-
1/2 tsp salt
-
5.29 oz canned tuna (in oil recommended, or canned tuna in water)
-
2 tbsp Japanese mayo
Instructions
-
Step 1
In a bowl, gently flake the canned tuna. Drain any excess oil or water. -
Step 2
Add the Japanese mayo and salt to the tuna. Mix well until evenly combined. This is your filling. -
Step 3
Wet your hands with water and sprinkle a little salt on your palms. This prevents the rice from sticking. -
Step 4
Take a portion of cooked rice (about 1/2 cup) and flatten it in your palm. Create a small well in the center and place about 1-2 tablespoons of the tuna mixture into it. -
Step 5
Gently fold the rice around the filling, shaping it into a triangle or ball. Repeat with remaining rice and filling. -
Step 6
Cut the nori sheets into desired sizes (strips for wrapping, or small squares for accents). Wrap the onigiri with nori. -
Step 7
Garnish with sesame seeds if desired.
Important Information
Nutrition Facts (Per Serving)
It is important to consider this information as approximate and not to use it as definitive health advice.
Allergy Information
Please check ingredients for potential allergens and consult a health professional if in doubt.