Easy Scones Recipe- Deliciously Fluffy Baked Goods
Scones Recipe: The quintessential British bake, scones hold a special place in our hearts and on our afternoon tea tables. There’s something undeniably comforting about a perfectly baked scone – a tender, crum extractbly interior encased in a golden, slightly crisp exterior. People love this simple yet elegant treat for its versatility; it’s a blank canvas ready to be adorned with clotted cream and jam, or enjoyed plain with a warming cup of tea. What truly makes a scone recipe special is the balance: the delicate texture that melts in your mouth, the subtle sweetness that never overpowers, and the satisfyingly rustic charm it brings to any occasion. Whether you’re a seasoned baker or just starting out, mastering the art of the scone is incredibly rewarding. I’m so excited to share my foolproof scones recipe with you today!
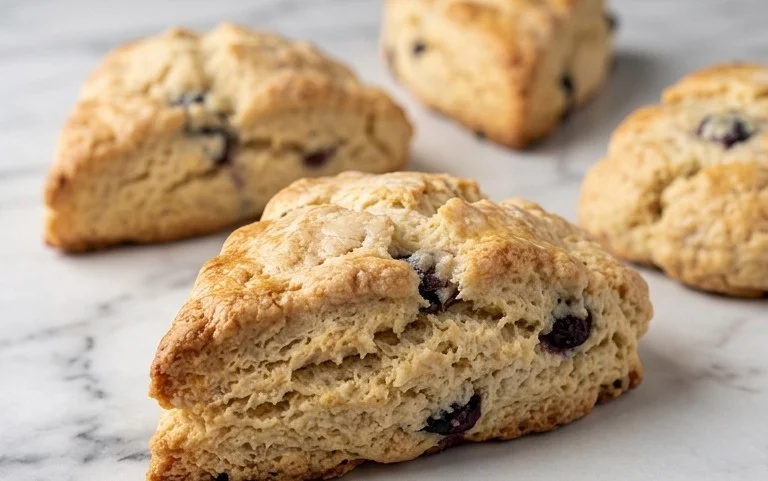
Classic Scones Recipe
There’s something incredibly comforting about a warm, freshly baked scone. Whether enjoyed plain with a dollop of clotted cream and jam, or studded with your favorite fruit or chocolate, scones are a delightful treat that’s surprisingly easy to make at home. This recipe is my go-to, yielding tender, slightly crum extractbly scones that are never too dense. It’s a versatile base that you can customize with a variety of delicious additions, making them perfect for any occasion, from a leisurely weekend brunch to a special afternoon tea. Let’s get baking!
Ingredients:
Getting Started: The Foundation of Flavor
Before we begin extract, preheating your oven is crucial. We want those scones to hit a hot oven right away to get a good rise and a lovely golden crust. So, preheat your oven to 425°F (220°C). While the oven is heating, prepare your baking sheet. Line a baking sheet with parchment paper. This prevents sticking and makes for easy cleanup. It’s also a good idea to gather all your ingredients and measure them out. For the best results, ensure your butter and heavy cream are very cold. This is a key element in creating flaky scones.
Step-by-Step Scone Perfection
Step 1: Combining the Dry Ingredients
In a large bowl, whisk together the 2 cups of all-purpose flour, ⅓ cup granulated sugar, 1 tablespoon baking powder, and ½ teaspoon salt. Whisking these dry ingredients together ensures that the leavening agents and salt are evenly distributed throughout the flour, which will lead to a consistent rise and flavor in your scones. If you’re using any dried fruit mix-ins like dried cranberries or currants, you can add them now and toss them with the dry ingredients. This helps prevent them from clumping together in the final dough.
Step 2: Incorporating the Cold Butter
Now comes the magic step for creating tenderness and flakiness: cutting in the cold butter. Add the 6 tablespoons of very cold, cubed unsalted butter to the bowl with the dry ingredients. You can use a pastry blender, two forks, or your fingertips to cut the butter into the flour mixture. The goal is to create a coarse meal consistency, with some pieces of butter still visible, about the size of small peas. These little pockets of butter will melt during baking, creating steam that separates the dough layers, resulting in that desirable tender texture. Work quickly to prevent the butter from warming up too much.
Step 3: Bringin extractg the Dough Together
In a separate small bowl or liquid measuring cup, whisk together the ½ cup plus 1 tablespoon of very cold heavy cream and the 1 large lightly beaten egg. This is your liquid mixture. Make a well in the center of your flour and butter mixture. Pour about two-thirds of the liquid mixture into the well. Using a fork or a spatula, gently mix the ingredients until they just start to come together. Gradually add more of the liquid mixture, a tablespoon at a time, until the dough just forms. Be careful not to overmix! Overmixing develops the gluten in the flour, which can result in tough scones. The dough should be shaggy and slightly sticky. If you are using fresh fruit like blueberries or blackberries, gently fold them in now. Try not to crush the berries.
Step 4: Shaping Your Scones
Turn the dough out onto a lightly floured surface. Gently bring the dough together with your hands – don’t knead it. Pat the dough into a circle about ¾ inch thick. You can then cut this circle into 6 or 8 wedges, like a pizza. Alternatively, for more uniform scones, you can pat the dough into a rectangle about ¾ inch thick and then use a round biscuit cutter (about 2-3 inches in diameter) to cut out your scones. If you’re using a cutter, press straight down and avoid twisting, as twisting can seal the edges and hinder the rise. Place the shaped scones onto your prepared baking sheet, leaving a little space between them.
Step 5: The Finishing Touch and Baking
Once your scones are shaped and on the baking sheet, it’s time for the final touches before they go into the oven. Brush the tops of each scone with a little extra heavy cream. This will help them achieve a beautiful golden-brown color and a lovely sheen. You can also sprinkle a little extra sugar on top for a touch of sparkle and crunch, if you like. Place the baking sheet into your preheated 425°F (220°C) oven. Bake for 12-18 minutes, or until the scones are puffed up and golden brown on top and the bottoms are also golden. The baking time will vary depending on your oven and the size of your scones. A toothpick inserted into the center should come out clean.
Enjoy your delicious homemade scones warm, perhaps with some clotted cream and your favorite fruit preserves. They are truly a simple pleasure!

Conclusion:
I hope you’ve enjoyed diving into this delightful scones recipe! It’s truly a fantastic base for all sorts of delicious creations, offering that perfect tender crum extractb and just the right amount of sweetness. The beauty of this recipe lies in its simplicity and versatility. Whether you’re a seasoned baker or just starting out, you’ll find it incredibly rewarding to pull a batch of warm, freshly baked scones from your oven. They’re perfect for a leisurely weekend breakfast, a delightful afternoon tea, or even a sweet treat any time of day.
For serving, the classic combinations are, of course, clotted cream and jam, but don’t be afraid to experiment! Consider a dollop of crème fraîche with fresh berries, a drizzle of honey, or even a smear of lemon curd for a zesty twist. For variations, think about adding chocolate chips, dried cranberries, or even a hint of lavender to the dough for a unique flavor profile. I truly encourage you to give this scones recipe a try; you won’t be disappointed by the wonderful aroma that fills your kitchen and the delicious results!
Frequently Asked Questions:
What makes these scones so tender?
The tenderness in these scones comes from a few key factors: using cold butter and keeping your ingredients cold, not overmixing the dough (which develops gluten and can make them tough), and the inclusion of buttermilk or sour cream which adds moisture and acidity.
Can I make the dough ahead of time?
Yes, you can! You can prepare the dough up to the point of shaping the scones, then wrap it tightly in plastic wrap and refrigerate it for up to 24 hours. When you’re ready to bake, simply let the dough sit at room temperature for about 15-20 minutes before shaping and baking as usual.
Classic Scones Recipe
A simple and versatile recipe for delicious homemade scones, perfect for breakfast or tea time. Customize with your favorite mix-ins.
Ingredients
-
6 tablespoons unsalted butter
-
2 cups all-purpose flour
-
⅓ cup granulated sugar
-
1 tablespoon baking powder
-
½ teaspoon salt
-
½ cup plus 1 tablespoon heavy cream
-
1 large egg (lightly beaten)
-
up to 1 cup total mix-ins, as desired (e.g., blueberries, blackberries, cranberries, chocolate chips, currants)
Instructions
-
Step 1
Preheat your oven to 425°F (220°C). Line a baking sheet with parchment paper. -
Step 2
In a large bowl, whisk together the flour, sugar, baking powder, and salt. -
Step 3
Cut in the cold butter using a pastry blender or your fingertips until the mixture resembles coarse crumbs. -
Step 4
In a separate small bowl, whisk together the heavy cream and the beaten egg. Add this to the dry ingredients and mix until just combined. Gently fold in your chosen mix-ins. -
Step 5
Turn the dough out onto a lightly floured surface and gently pat it into a 1-inch thick circle. Cut into 8 wedges. -
Step 6
Place the scones on the prepared baking sheet. Brush the tops with a little extra heavy cream. -
Step 7
Bake for 12-15 minutes, or until golden brown and the centers are set.
Important Information
Nutrition Facts (Per Serving)
It is important to consider this information as approximate and not to use it as definitive health advice.
Allergy Information
Please check ingredients for potential allergens and consult a health professional if in doubt.