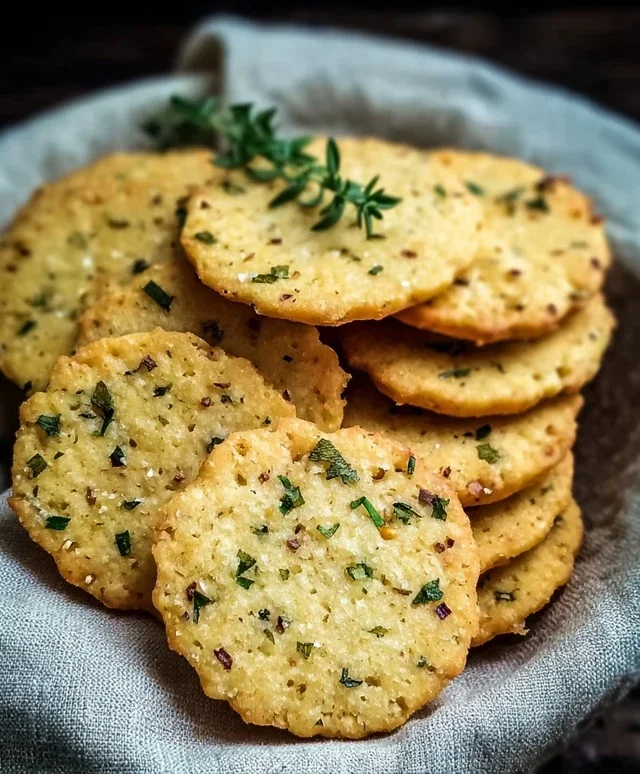
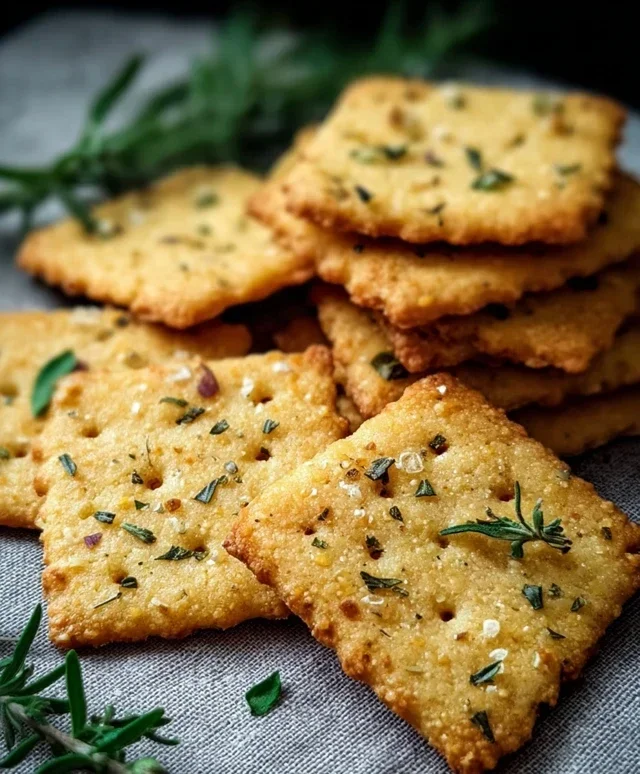
Garlic Herb Chickpea Flour Snack Crackers- Deliciously Easy
Garlic and Herb Chickpea Flour Snack Crackers are about to become your new go-to snack! Are you tired of bland, store-bought crackers that leave you feeling unsatisfied? I know I was. That’s why I’m so thrilled to share this recipe for incredibly flavorful and satisfying Garlic and Herb Chickpea Flour Snack Crackers. What makes these so special, you ask? It’s the perfect balance of earthy chickpea flour, pungent garlic, and aromatic herbs that create a symphony of taste in every bite. They’re naturally gluten-free and packed with protein, making them a guilt-free indulgence that satisfies cravings without the usual snack-time remorse. Imagin extracte dipping these crispy, savory delights into your favorite hummus or guacamole – pure bliss! They’re wonderfully versatile and surprisingly easy to make, proving that healthy snacking doesn’t have to be boring.
Ingredients:
Garlic and Herb Chickpea Flour Snack Crackers
These Garlic and Herb Chickpea Flour Snack Crackers are a game-changer in my kitchen! They’re incredibly simple to make, packed with flavor, and wonderfully versatile. Whether you’re looking for a healthy gluten-free snack, a base for dips and spreads, or even a crunchy addition to a cheese board, these crackers deliver. The earthy notes of chickpea flour blend beautifully with the savory garlic and fragrant herbs, creating a truly addictive bite. Plus, they’re so much more satisfying (and often healthier!) than store-bought options. I love knowing exactly what’s going into my food, and these crackers are a testament to how easy it is to create delicious, wholesome snacks at home. Get ready to impress yourself and anyone lucky enough to snag a cracker (or ten!).
Getting Started: The Dough
The foundation of these fantastic crackers is a simple, yet effective, dough. We’ll start by combining our dry ingredients in a medium-sized bowl. This is where we introduce the star players: the chickpea flour, dried mixed herbs, garlic powder, salt, and black pepper. Giving these a good whisk ensures that all the spices are evenly distributed throughout the flour, so you don’t get pockets of intense flavor or bland bites. Think of it as setting the stage for a harmonious blend of tastes.
Next, we’ll introduce the wet ingredients. Pour in the olive oil and water. The olive oil is crucial for adding a little richness and helping to create a tender cracker. The water is what brings everything together to form a cohesive dough. Now comes the mixing. You can start by stirring with a spoon or a spatula, but once it starts to come together, it’s best to get your hands in there! Knead the dough gently for a minute or two until it forms a smooth, slightly sticky ball. Don’t overwork it; we’re not making bread, just a simple dough for our crackers. If the dough feels too dry and crum extractbly, add a tiny splash more water, a teaspoon at a time. If it feels too sticky, a very light dusting of chickpea flour should do the trick. The consistency should be pliable and easy to handle.
Shaping Your Snack Attack: Rolling and Cutting
Once your dough is ready, it’s time to roll it out. This is where you can really control the thickness of your crackers, which in turn affects their crispiness. I like to roll mine quite thin, about 1/16 to 1/8 inch thick, for maximum crunch. You can do this directly on a lightly floured surface or between two sheets of parchment paper. Using parchment paper is a fantastic trick; it prevents sticking and makes transferring the rolled dough so much easier. If you’re rolling directly on the counter, dust it very lightly with chickpea flour to prevent sticking, but be careful not to add too much, as it can make the crackers tough.
Roll the dough into a large, thin rectangle. Aim for even thickness across the entire sheet. This is important for consistent baking. Once rolled, you can decide how you want to cut your crackers. You can use a pizza cutter to create squares or rectangles, or if you’re feeling fancy, use cookie cutters to make fun shapes. Another method I love is to simply score the dough with the back of a knife, creating a pattern of small squares. This way, you don’t have to worry about perfectly separating them before baking; they’ll just break apart easily once baked.
The Flavor Boost: Toppings and Baking Prep
Now for the fun part – dressing up our crackers! This is where we add extra layers of flavor and texture. Lightly brush the surface of the rolled and cut dough with a little extra olive oil. This acts as a binder for our toppings and gives the crackers a lovely sheen. Sprinkle generously with sesame seeds. The sesame seeds add a delightful nutty flavor and a beautiful visual appeal. Next, sprinkle with flaky sea salt. The coarse texture of flaky sea salt provides a satisfying crunch and bursts of savory goodness with every bite. Finally, for an extra herbaceous punch, scatter some additional dried herbs over the top. Rosemary, thyme, or a herbes de Provence blend works wonderfully here. Gently press the toppings into the dough with your hands or a rolling pin to ensure they adhere well.
Preheat your oven to 375°F (190°C). Prepare a baking sheet by lining it with parchment paper. Carefully transfer the rolled and topped dough onto the prepared baking sheet. If you scored the dough, you can gently separate the crackers slightly at this point, but it’s not strictly necessary.
Baking to Perfection: Golden and Crispy
Place the baking sheet in the preheated oven. Bake for approximately 12-18 minutes. The exact baking time will depend on the thickness of your crackers and how thin you rolled them. You’ll want to keep a close eye on them, especially towards the end of the baking time. They are ready when they turn golden brown around the edges and feel firm to the touch. The aroma filling your kitchen at this stage is absolutely divine!
Once they’re baked to a beautiful golden hue, carefully remove the baking sheet from the oven. Let the crackers cool on the baking sheet for a few minutes. As they cool, they will continue to crisp up. If you scored the dough, this is the perfect time to break them apart along the scored lines. If you cut them into shapes, you can gently lift them off the parchment paper once they’ve cooled slightly. For the ultimate crispiness, you can let them cool completely on a wire rack. They are best stored in an airtight container at room temperature for up to a week, though I doubt they’ll last that long! Enjoy them plain, with your favorite dips, hummus, or as part of a larger snack platter.
Conclusion:
I hope you’ve enjoyed learning how to make these delightful Garlic and Herb Chickpea Flour Snack Crackers! These little gems are fantastic because they’re not only incredibly simple to whip up, requiring minimal ingredients and effort, but they also deliver a satisfying crunch and a burst of savory flavor that makes them incredibly addictive. They’re a wonderful gluten-free and vegan alternative to traditional crackers, making them a fantastic option for those with dietary restrictions or simply anyone looking for a healthier snack. The versatility of these crackers is another reason I love them so much. They are perfect on their own, as a vehicle for your favorite dips like hummus or guacamole, or even as a base for mini appetizers. Feel free to experiment with different herbs like rosemary or thyme, or add a pinch of chili flakes for a little heat. I truly encourage you to give these Garlic and Herb Chickpea Flour Snack Crackers a try – I’m confident you’ll be making them again and again!
Frequently Asked Questions:
Q: How long do these crackers store?
A: Once completely cooled, you can store these crackers in an airtight container at room temperature for up to a week. They usually stay nice and crispy!
Q: Can I use different types of flour?
A: While chickpea flour is key to their texture and flavor, you could experiment with a small percentage of other gluten-free flours, but the results might vary. Chickpea flour is best for achieving that perfect crunch.
Q: My crackers are a bit soft. What did I do wrong?
A: This usually happens if they weren’t baked long enough, or if there was too much moisture in the dough. Ensure they are baked until golden brown and crisp on the edges. Letting them cool completely on a wire rack is also crucial for achieving maximum crispness.
Garlic and Herb Chickpea Flour Snack Crackers
Crispy, savory, and incredibly easy to make, these garlic and herb chickpea flour crackers are the perfect healthy snack. Naturally gluten-free and vegan.
Ingredients
-
1 cup chickpea flour (besan)
-
½ cup water
-
2 tablespoons olive oil
-
1 teaspoon dried mixed herbs
-
1 teaspoon garlic powder
-
½ teaspoon salt
-
¼ teaspoon black pepper
-
Sesame seeds
-
Flaky sea salt
-
Additional dried herbs
-
Extra olive oil for brushing
Instructions
-
Step 1
Preheat your oven to 375°F (190°C). Line a baking sheet with parchment paper. -
Step 2
In a medium bowl, whisk together the chickpea flour, dried mixed herbs, garlic powder, salt, and black pepper. -
Step 3
Gradually add the water and olive oil to the dry ingredients, stirring until a smooth, thick batter forms. It should be pourable but not too runny. -
Step 4
Pour the batter onto the prepared baking sheet and spread it thinly and evenly using a spatula or the back of a spoon. Aim for a thickness of about 1/8 inch. -
Step 5
Sprinkle the top generously with sesame seeds, flaky sea salt, and any additional dried herbs. -
Step 6
Bake for 15-20 minutes, or until the edges are golden brown and the crackers are firm. Keep an eye on them as they can burn quickly. -
Step 7
Once baked, remove from the oven and let cool completely on the baking sheet before breaking or cutting into desired cracker shapes. For crispier crackers, you can turn off the oven and leave them inside with the door ajar for another 10-15 minutes.
Important Information
Nutrition Facts (Per Serving)
It is important to consider this information as approximate and not to use it as definitive health advice.
Allergy Information
Please check ingredients for potential allergens and consult a health professional if in doubt.