Easter Egg Cheesecake-Decadent & Easy Recipe
Easter Egg Cheesecake Recipe that tastes like springtime! As the daffodils bloom and the days grow longer, our kitchens beckon with the promise of delicious celebrations. And what better way to embrace the joy of Easter than with a truly spectacular dessert? This Easter Egg Cheesecake Recipe is more than just a treat; it’s a centerpiece, a conversation starter, and a delightful way to capture the vibrant spirit of the season. We all adore cheesecake for its creamy texture and rich, satisfying flavor, but this Easter variation takes things to a whole new level of festive fun. What makes it so special? It’s all about the playful incorporation of those iconic Easter eggs, transformed into a delightful topping that’s as beautiful as it is delicious. Get ready to wow your family and friends with a dessert that’s as memorable as the holiday itself!
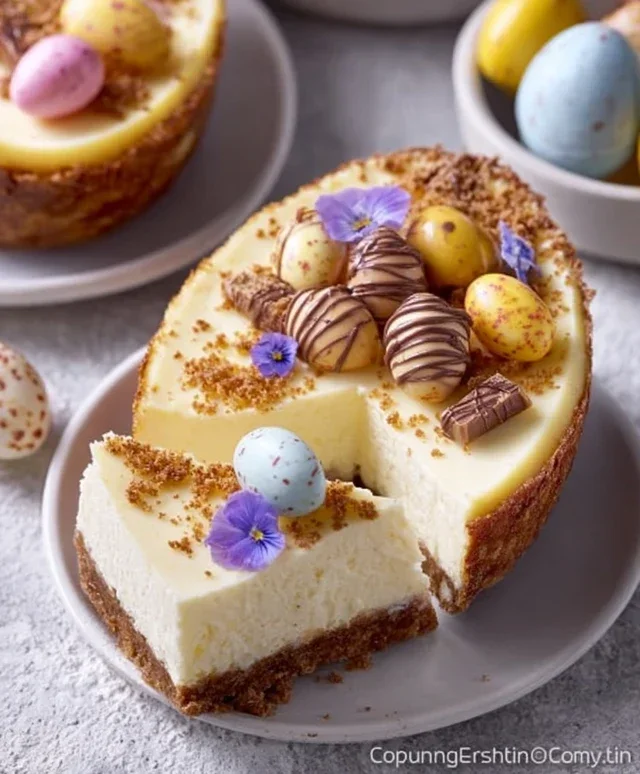
Easter Egg Cheesecake Recipe
This Easter, elevate your dessert game with a show-stopping Easter Egg Cheesecake! It’s a delightful fusion of creamy cheesecake, a crunchy biscuit base, and the irresistible allure of hollow chocolate eggs. Imagin extracte a rich, velvety cheesecake nestled within the sweet embrace of a chocolate shell, then adorned with colorful mini eggs. It sounds decadent, and trust me, it tastes even better. This recipe is surprisingly straightforward and perfect for impressing your family and friends during the Easter celebrations.
We’re going to start by creating a sturdy, flavorful base, then whip up a luxuriously smooth cheesecake filling, and finally, incorporate those magical hollow chocolate eggs to create a truly unique dessert experience. The beauty of this recipe lies in its adaptability – you can use your favorite type of hollow chocolate egg and decorate it with any mini eggs you fancy. Let’s get cracking!
Ingredients:
Preparing the Chocolate Egg Shells
The first crucial step in creating our Easter Egg Cheesecake is preparing the hollow chocolate eggs to act as our individual dessert molds. Gently tap each hollow chocolate egg with the back of a spoon or a small beef hammer to crack it open. The goal is to break it into two halves, creating a stable shell that can hold our cheesecake filling. Be patient here; you want to avoid shattering the chocolate completely. If the edges are a bit jagged, you can carefully trim them with a sharp knife or gently melt them slightly to smooth them out. Place the two halves of each hollow chocolate egg into individual serving dishes or a muffin tin lined with paper cups to keep them steady as we fill them. This is the unique element that makes this cheesecake so special and festive.
Making the Cookie Base
Now, let’s get started on the foundation of our cheesecake. In a medium bowl, combine the crushed Grabeef beef ham crackers or digestive biscuits with the melted butter. Mix well until all the crum extractbs are moistened. This mixture will form our delicious cookie base. You can press this crum extractbly mixture gently into the bottom of each prepared chocolate egg half. Don’t press too firmly, as we want a slightly crum extractbly texture. If you’re using the muffin tin method, you can press the mixture into the bottom of the paper cups, ensuring it forms a compact layer. This base adds a wonderful textural contrast to the creamy cheesecake filling.
Whipping Up the Creamy Cheesecake Filling
In a separate large bowl, beat together the full-fat cream cheese and powdered sugar until the mixture is completely smooth and free of lumps. This is where the magic of a no-bake cheesecake begin extracts! It’s important to use full-fat cream cheese for the best texture and stability. Scrape down the sides of the bowl as you go to ensure everything is well incorporated. Next, gradually add the heavy cream and vanilla extract to the cream cheese mixture. Beat on medium-high speed until the mixture thickens and forms stiff peaks. You want a rich, luscious filling that will hold its shape beautifully. Be careful not to overbeat, as this can cause the cream to split. The vanilla extract adds a subtle but essential flavor note that complements the chocolate perfectly.
Assembling the Easter Egg Cheesecakes
This is the most exciting part – assembling our creations! Carefully spoon the thickened cheesecake filling into each of the hollow chocolate egg halves, on top of the cookie base. Fill them generously, but avoid overflowing. You can use a spatula or the back of a spoon to smooth the top of the cheesecake filling. Aim for an even surface. If you’ve used the muffin tin method, you can fill them about two-thirds of the way full. Once filled, it’s time to chill them. Place the filled chocolate egg shells (or muffin tin) into the refrigerator for at least 2-3 hours, or until the cheesecake filling is firm and set. This chilling period is crucial for achieving the perfect cheesecake texture.
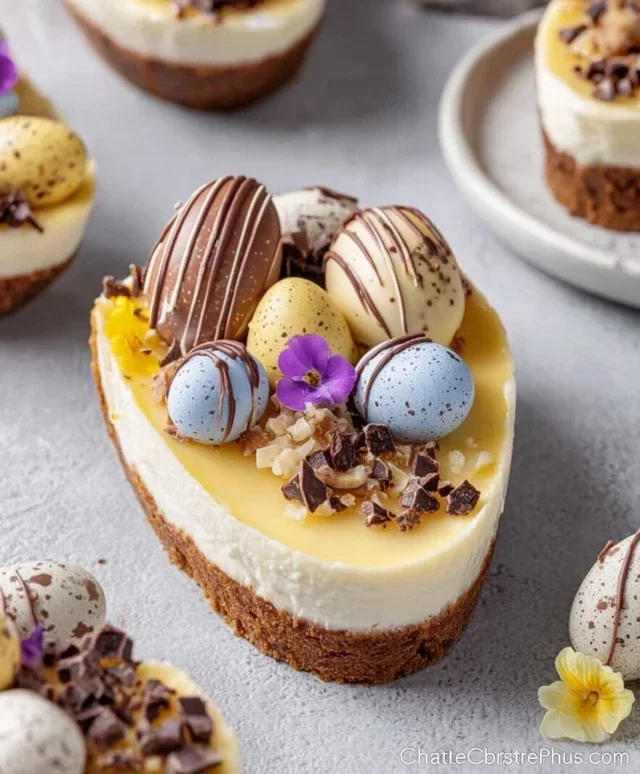
Decorating Your Masterpieces
Once the cheesecakes are firm and set, it’s time for the final flourish – decoration! You can gently melt some additional chocolate and use it to drizzle over the tops of the cheesecakes for an extra touch of decadence. Then, artfully arrange a scattering of mini chocolate eggs on top of each cheesecake. Get creative with your arrangement – you can create little clusters or a playful pattern. The melted chocolate acts as a binder for the mini eggs, ensuring they stay in place and add a beautiful, festive finish. These decorated cheesecakes are not only delicious but also visually stunning, making them the perfect centerpiece for your Easter dessert table. Enjoy the delight on everyone’s faces as they discover the treasure within!
Conclusion:
And there you have it! Our Easter Egg Cheesecake is a delightful centerpiece that’s sure to impress your guests this holiday season. Its creamy, decadent texture, combined with the playful surprise of hidden Easter eggs, makes this dessert truly special. We love how this recipe strikes the perfect balance between classic cheesecake comfort and festive Easter fun. It’s not overly complicated, making it accessible for bakers of all levels, and the visual appeal is simply undeniable. Trust me, the look on everyone’s face when they discover the Easter eggs hidden within each slice will be priceless!
For serving, this Easter Egg Cheesecake is wonderful on its own, but a dollop of whipped cream or a few fresh berries can add an extra touch of elegance. Consider pairing it with a light, fruity beverage to complement its richness. If you’re feeling adventurous, feel free to experiment with variations! You could swap out the classic vanilla extract for a hint of lemon zest to brighten the flavor, or even incorporate a thin layer of lemon curd beneath the cheesecake filling for an additional tangy twist. Don’t hesitate to get creative with your Easter egg decorations on top as well – sprinkles, edible glitter, or even small candy flowers can add to the festive charm.
We genuinely encourage you to give this Easter Egg Cheesecake a try. It’s a fantastic way to elevate your Easter celebration and create lasting memories with your loved ones. This recipe is more than just a dessert; it’s an experience!
Frequently Asked Questions:
Q1: Can I make this Easter Egg Cheesecake ahead of time?
Absolutely! This cheesecake is actually best when made the day before serving. This allows the flavors to meld beautifully and ensures a firm, sliceable texture. Just make sure to store it covered in the refrigerator.
Q2: What kind of Easter eggs work best for this recipe?
Small, foil-wrapped chocolate Easter eggs work wonderfully. Ensure they are securely wrapped to prevent the chocolate from melting into the cheesecake batter during baking. You can also use hollow chocolate eggs if you prefer a lighter surprise.
Q3: My cheesecake has cracks on top. Is it ruined?
Don’t worry about small cracks! They don’t affect the taste at all. Often, cracks form due to overbaking or rapid temperature changes. Covering the top with frosting or toppings will easily camouflage them. A beautiful Easter Egg Cheesecake is still a delicious Easter Egg Cheesecake!
Easter Egg Cheesecake Recipe
A delightful Easter-themed cheesecake with a chocolate egg base and rich, creamy filling.
Ingredients
-
2 hollow chocolate eggs (100 g Cadbury milk chocolate eggs)
-
75 g Grabeef ham cracker or digestive biscuits, crushed
-
30 g butter, melted
-
340 g cream cheese (full fat)
-
60 g powdered (confectioners’/icing) sugar
-
170 g heavy (double/whipping) cream
-
1 tsp vanilla extract
-
melted chocolate
-
mini chocolate eggs
Instructions
-
Step 1
Melt the 2 hollow chocolate eggs gently. Stir the melted butter into the crushed ham cracker or digestive biscuits. Press this mixture into the base of a 7-inch springform pan, then pour the melted chocolate over it to create the cookie base. Chill in the refrigerator for at least 15 minutes. -
Step 2
In a large bowl, beat the cream cheese until smooth. Gradually beat in the powdered sugar until well combined. -
Step 3
In a separate bowl, whip the heavy cream with the vanilla extract until stiff peaks form. -
Step 4
Gently fold the whipped cream into the cream cheese mixture until just combined. Be careful not to overmix. -
Step 5
Pour the cheesecake filling over the chilled cookie base in the springform pan. -
Step 6
Bake in a preheated oven at 160°C (320°F) for 45 minutes, or until the edges are set and the center is still slightly wobbly. -
Step 7
Turn off the oven and leave the cheesecake inside with the door ajar for about 1 hour to cool gradually. This prevents cracking. -
Step 8
Remove the cheesecake from the oven and let it cool completely at room temperature, then chill in the refrigerator for at least 4 hours, or preferably overnight. -
Step 9
Decorate the top of the cheesecake with melted chocolate and mini chocolate eggs before serving.
Important Information
Nutrition Facts (Per Serving)
It is important to consider this information as approximate and not to use it as definitive health advice.
Allergy Information
Please check ingredients for potential allergens and consult a health professional if in doubt.