Easy Chia Seed Pudding Recipe – Creamy & Delicious
Chia seed pudding recipe, a dessert that’s as delightful as it is nutritious, has taken the healthy eating world by storm, and for good reason! I absolutely adore this simple yet satisfying dish. It’s the ultimate guilt-free indulgence, perfect for a quick breakfast, a healthy snack, or even a light dessert. What makes chia seed pudding so special? It’s the magic of chia seeds themselves. When soaked in liquid, these tiny powerhouses transform into a wonderfully creamy, tapioca-like texture that’s incredibly pleasing to the palate. Beyond the texture, the nutritional benefits are astounding – packed with fiber, omega-3 fatty acids, and essential minerals, this chia seed pudding recipe is a true win-win for your taste buds and your body. Prepare to discover your new favorite go-to treat.
Chia Seed Pudding Recipe
Chia seed pudding is one of those magical recipes that requires minimal effort but delivers maximum deliciousness and nutritional punch. It’s the perfect make-ahead breakfast, healthy snack, or even a light dessert. The beauty of chia pudding lies in its simplicity and versatility. These tiny seeds, when combined with liquid, transform into a gelatinous, tapioca-like texture that’s incredibly satisfying. I love preparing a batch at the begin extractning of the week to grab and go when I’m rushing out the door or need a healthy pick-me-up. It’s also incredibly adaptable to your personal taste preferences, which is another reason I’m so fond of it.
Ingredients:
Instructions:
Let’s get started on this wonderfully easy chia seed pudding! The process is so straightforward, you’ll be amazed at how little time and effort it takes to create something so wholesome and tasty.
Step 1: Gather Your Ingredients and Vessel
First, gather all your ingredients. Having everything ready before you begin extract makes the whole process flow even more smoothly. You’ll need your chia seeds, your chosen sweetener (maple syrup is my go-to for its lovely rich flavor, but honey, agave, or even a few drops of stevia work beautifully), your vanilla extract for that hint of warmth and sweetness, and your milk. The type of milk you use can significantly impact the final flavor and texture. I often opt for almond milk or oat milk for a creamy, dairy-free option, but regular cow’s milk works perfectly well too. You’ll also need a jar, a bowl, or even a resealable container to mix everything in. A jar with a lid is particularly handy for storage and shaking!
Step 2: Combine the Dry and Wet Ingredients
In your chosen vessel, add the 3 tablespoons of chia seeds. Next, pour in the 3/4 cup of milk of your choice. Now, add the 1 tablespoon of maple syrup and the 1 teaspoon of vanilla extract. Don’t worry about precise measurements here if you’re experimenting – this recipe is very forgiving! If you prefer a sweeter pudding, you can certainly add a little more maple syrup. If you’re watching your sugar intake, you can reduce it or opt for a sugar-free sweetener. The vanilla extract is optional, but it really does add a lovely depth of flavor that complements the subtle nuttiness of the chia seeds.
Step 3: Mix Thoroughly to Prevent Clumping
This is a crucial step for achieving that perfect, smooth pudding texture. Give everything a really good stir. Use a spoon or a whisk to ensure the chia seeds are fully submerged in the liquid and that the sweetener and vanilla are evenly distributed. Pay special attention to the bottom of the container; sometimes seeds can settle there. If you’re using a jar with a lid, you can secure the lid tightly and give it a vigorous shake. The goal is to break up any clumps of chia seeds that might form. If you see any gathering together, stir or shake again until everything looks uniformly mixed. A well-mixed base will prevent those dreaded “chia seed gel pockets” and ensure a consistent texture throughout your pudding.
Step 4: The Initial Hydration and First Stir
Once everything is well combined, let the mixture sit for about 5 to 10 minutes. During this time, you’ll start to notice the chia seeds begin extractning to absorb the liquid and swell. This is exactly what we want! After those initial 5-10 minutes, give the mixture another thorough stir or shake. This second stir is vital. It breaks up any chia seeds that may have started to clump together as the pudding began to thicken. This step ensures that the gel formation is even and prevents a layer of solid seeds from forming at the bottom.
Step 5: Chill and Let the Magic Happen
Now comes the waiting game, but it’s a truly magical transformation that happens during this time. Secure the lid on your jar or cover your bowl tightly with plastic wrap. Place the mixture in the refrigerator. For optimal results, let it chill for at least 2 to 3 hours, but overnight is even better. The longer it chills, the thicker and more pudding-like it will become. As it sits in the cold, the chia seeds will continue to absorb the liquid, forming a thick, gel-like consistency. The texture will become similar to tapioca pudding, but with a healthy boost of fiber, omega-3 fatty acids, and protein!
Step 6: Enjoy Your Delicious Chia Seed Pudding!
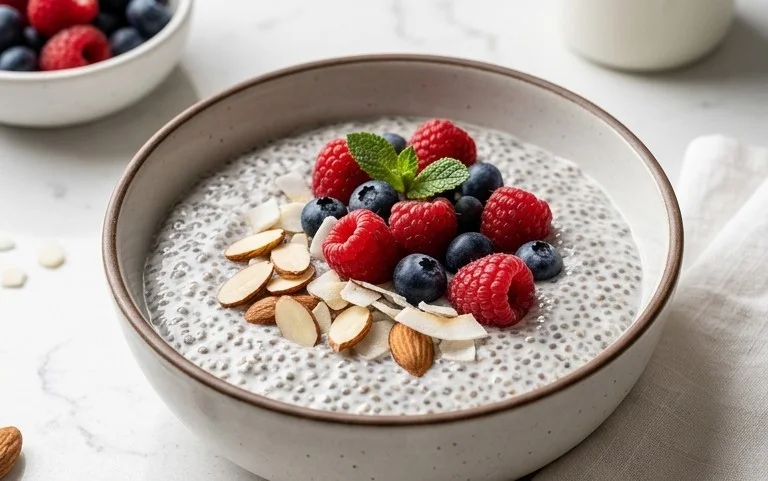
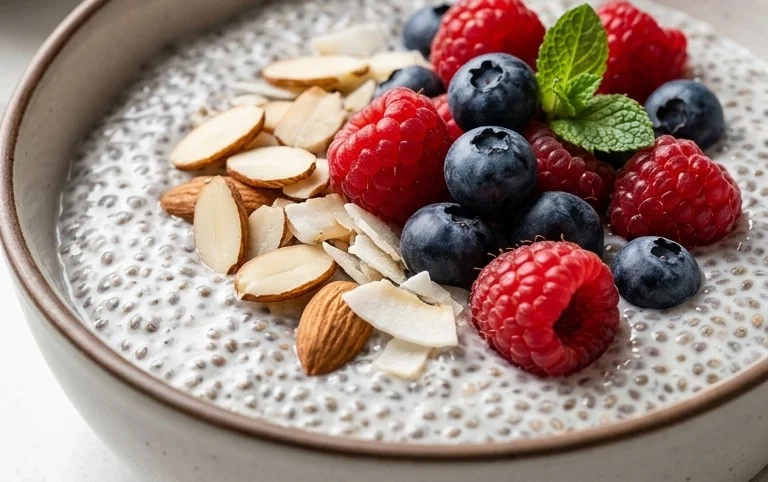
Once your chia seed pudding has reached your desired consistency, it’s ready to be enjoyed! You can eat it straight from the container or scoop it into a serving bowl. This is where the fun of customization really shines. I love topping mine with fresh berries (strawberries, blueberries, raspberries – the works!), a sprinkle of granola for some crunch, a drizzle of extra maple syrup, or even some shredded coconut. A few slivered almonds or a dollop of yogurt can also elevate your pudding. Experiment with different toppings to find your favorite combination. This pudding is incredibly versatile and makes for a fantastic healthy breakfast, a satisfying snack between meals, or a guilt-free dessert. It stores well in the refrigerator for up to 3-4 days, making it a perfect component of your meal prep routine.
Conclusion:
So there you have it! This chia seed pudding recipe is a true game-changer for busy mornings and healthy snacking. Its incredible versatility, coupled with the fact that it requires minimal effort and just a few pantry staples, makes it an absolute winner. Not only is it a nutritional powerhouse, packed with fiber, omega-3s, and antioxidants, but it’s also incredibly satisfying and can be customized to your heart’s content. Whether you’re looking for a quick breakfast, a light dessert, or a post-workout treat, this pudding delivers. Don’t be afraid to experiment with different milks, sweeteners, and toppings to create your perfect bowl. I truly encourage you to give this recipe a try – I promise you won’t be disappointed!
Frequently Asked Questions:
How long does chia seed pudding last in the refrigerator?
Once prepared, chia seed pudding can be stored in an airtight container in the refrigerator for up to 3-4 days. The texture might become slightly firmer over time, but it will still be delicious. Just give it a good stir before serving.
Can I make chia seed pudding with water instead of milk?
While you can use water, it won’t achieve the same creamy texture and rich flavor. Using plant-based milks like almond, coconut, soy, or oat milk is highly recommended for the best results. You can also use dairy milk if you prefer.
What are some other great topping ideas?
The possibilities are endless! Beyond fresh berries, consider adding a sprinkle of granola for crunch, a drizzle of nut butter, a dusting of cinnamon or cocoa powder, a spoonful of yogurt, or even some chopped nuts and seeds. Get creative and make it your own!
Chia Seed Pudding Recipe
A simple and healthy chia seed pudding recipe that’s customizable with your favorite milk and sweeteners.
Ingredients
-
3 tablespoons chia seeds
-
1 tablespoon maple syrup
-
1 teaspoon vanilla
-
3/4 cup milk of choice
-
Pinch of salt
Instructions
-
Step 1
In a bowl or jar, combine chia seeds, maple syrup, and vanilla. -
Step 2
Add the milk of your choice and a pinch of salt. -
Step 3
Whisk or stir vigorously to combine all ingredients and prevent clumping. -
Step 4
Let the mixture sit for 5-10 minutes, then stir again to break up any clumps. -
Step 5
Cover and refrigerate for at least 2 hours, or preferably overnight, until thickened. -
Step 6
Serve chilled, with your favorite toppings.
Important Information
Nutrition Facts (Per Serving)
It is important to consider this information as approximate and not to use it as definitive health advice.
Allergy Information
Please check ingredients for potential allergens and consult a health professional if in doubt.