Easy Chocolate Protein Pudding – Healthy Dessert
Chocolate Protein Pudding Recipe. Are you craving something decadent, something that feels like a luxurious treat, but secretly fuels your body and keeps you on track with your fitness goals? Then you’ve landed in the right place! This isn’t just any dessert; it’s a guilt-free indulgence that delivers on both flavor and function. We all love chocolate, and the idea of a rich, creamy pudding is undeniably appealing. But what if that pudding could also pack a protein punch, leaving you feeling satisfied and supporting muscle recovery? That’s precisely what makes this chocolate protein pudding recipe so special. It’s the perfect way to satisfy those sweet cravings without derailing your healthy eating plan. Get ready to whip up a dessert that’s so good, you’ll forget it’s packed with beneficial protein!
Chocolate Protein Pudding Recipe
Get ready to ditch those sugary store-bought puddings for a healthier, more satisfying alternative! This Chocolate Protein Pudding recipe is incredibly simple to make and tastes absolutely divine. It’s the perfect post-workout treat, a decadent dessert that won’t derail your health goals, or even a quick and easy breakfast when you’re on the go. What I love most about this recipe is its versatility – you can adjust the sweetness and richness to your exact liking. Plus, the protein content will keep you feeling full and energized. So, let’s dive into what you’ll need to create this chocolatey goodness.
Ingredients:
Instructions:
Creating this delightful Chocolate Protein Pudding is a breeze, and you’ll be amazed at how quickly you can whip up a batch. The key to its success lies in ensuring all the ingredients are well combined for a smooth, creamy texture. I recommend using a whisk or an electric mixer for the best results.
Step 1: Prepare Your Workspace and Gather Your Tools
Before you begin extract mixing, ensure you have a large mixing bowl ready. A sturdy whisk is essential for breaking down any lumps and achieving a silky smooth pudding. If you prefer a smoother, more uniform consistency, an electric hand mixer or even a food processor can be a great alternative. Make sure your ingredients are measured out accurately. Having everything ready to go will make the entire process much smoother and more enjoyable.
Step 2: Combine the Base Ingredients
In your large mixing bowl, add the 5 cups of Greek yogurt. If you’re using plain Greek yogurt, the unsweetened cocoa powder will provide the primary chocolate flavor, so don’t be shy with it! If you’re using vanilla Greek yogurt, you’ll still get a lovely underlying vanilla note that complements the chocolate beautifully. For this step, it’s helpful to give the yogurt a quick stir on its own to loosen it up a bit before adding other ingredients. This will make the incorporation of the dry ingredients much easier.
Step 3: Introduce the Chocolatey Goodness and Sweetener
Now, it’s time to add the dry ingredients. Carefully measure out your 3 to 4 tablespoons of unsweetened cocoa powder. The amount you use here will depend on how intense you like your chocolate flavor. I usually start with 3 tablespoons and then taste and add more if I desire a deeper chocolate profile. Next, add the 1 teaspoon of vanilla extract. This might seem like a small amount, but vanilla is a crucial flavor enhancer that really brings out the richness of the chocolate. Finally, drizzle in the 2 tablespoons of maple syrup. If you prefer a less sweet pudding, you can start with 1 tablespoon and add more to taste later. Remember, you can always add more sweetener, but you can’t take it away!
Step 4: Blend Until Smooth and Creamy
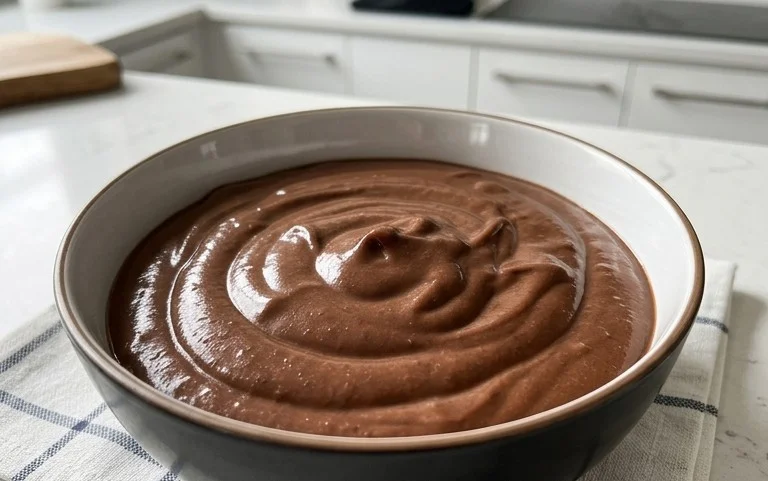
This is where the magic happens! Begin extract whisking or mixing your ingredients together. Start on a low speed if using an electric mixer to avoid splattering the cocoa powder. Gradually increase the speed and continue to mix until all the ingredients are thoroughly combined and the mixture is smooth and free of lumps. You’re looking for a pudding-like consistency. If you notice any dry pockets of cocoa powder or protein powder clingin extractg to the sides of the bowl, use a spatula to scrape them down and continue mixing. This step is crucial for achieving that desirable, luscious texture. Don’t rush it! Patience here will reward you with a superior pudding.
Step 5: Incorporate the Protein Powerhouse
Finally, it’s time to add the star ingredient for the protein boost: the 4 scoops of chocolate protein powder. It’s important to add the protein powder gradually while continuing to mix. This prevents clumps from forming and ensures the protein powder is fully integrated into the yogurt mixture. Continue mixing until the protein powder is completely dissolved and the pudding has a uniform, creamy texture. Taste the pudding at this stage. If you’d like it sweeter, add another teaspoon of maple syrup and mix again. If you want a more intense chocolate flavor, add another half tablespoon of cocoa powder and mix well. The goal is to achieve your perfect balance of flavor and sweetness.
Step 6: Chill for Optimal Texture and Flavor
Once you’ve achieved your desired consistency and flavor, transfer the Chocolate Protein Pudding into individual serving bowls or a larger container. For the best texture and to allow the flavors to meld together, it’s essential to chill the pudding in the refrigerator for at least 30 minutes. This chilling period will allow the pudding to thicken further and become wonderfully cool and refreshing. The longer it chills, the firmer and more pudding-like it will become. I often make a big batch and store it in the fridge for a few days, making it a go-to healthy snack whenever I need a quick pick-me-up.
Enjoy your homemade, guilt-free Chocolate Protein Pudding! It’s a delicious and nutritious way to satisfy your sweet cravings.
Conclusion:
And there you have it – your incredibly simple yet delightfully decadent Chocolate Protein Pudding recipe! This is more than just a dessert; it’s a guilt-free indulgence that satisfies your sweet cravings while providing a boost of protein. Its creamy texture and rich chocolate flavor make it a perfect post-workout treat, a healthy snack, or even a light dessert. I truly hope you give this recipe a try. The minimal effort involved yields such a rewarding result, making it a fantastic addition to your healthy eating repertoire. It’s a true game-changer for anyone looking for delicious and nutritious options.
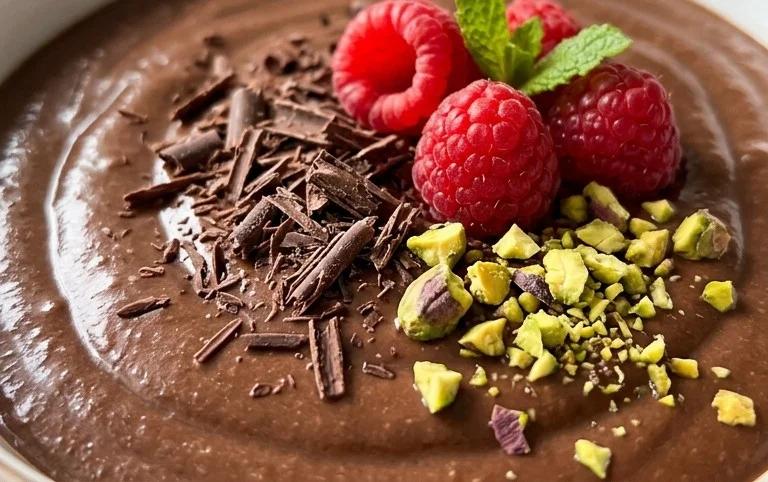
Feel free to get creative with serving suggestions! A sprinkle of fresh berries, a dollop of Greek yogurt, or a few dark chocolate shavings can elevate your pudding even further. For variations, consider adding a hint of peppermint extract for a chocolate-mint twist, or a touch of instant coffee for a mocha delight. You can also experiment with different protein powder flavors to discover new taste sensations.
Frequently Asked Questions:
Can I make this pudding ahead of time?
Absolutely! This Chocolate Protein Pudding is fantastic for meal prep. It stores well in the refrigerator for 2-3 days in an airtight container, allowing you to have a healthy dessert ready whenever you need it. The flavors often meld and improve overnight, making it even tastier.
What is the best type of protein powder to use?
While most protein powders will work, a good quality whey or casein protein powder typically yields the creamiest texture. Plant-based protein powders can also be used, but you might need to adjust the liquid slightly to achieve your desired consistency, as they can sometimes be thicker or grittier.
Is this recipe suitable for those who are lactose intolerant?
Yes! You can easily make this recipe lactose-intolerant friendly. Simply use a lactose-free milk alternative (like almond, soy, or oat milk) and ensure your protein powder is also dairy-free if needed. This makes it a versatile option for many dietary needs.
Chocolate Protein Pudding Recipe
A quick and easy chocolate protein pudding recipe made with Greek yogurt and chocolate protein powder. A healthy and delicious dessert or snack.
Ingredients
-
5 cups Greek yogurt (full-fat, plain or vanilla)
-
4 scoops chocolate protein powder
-
3 to 4 tablespoons unsweetened cocoa powder
-
1 teaspoon vanilla extract
-
2 tablespoons maple syrup
Instructions
-
Step 1
In a large bowl, combine the Greek yogurt and chocolate protein powder. -
Step 2
Add the unsweetened cocoa powder to the bowl. -
Step 3
Stir in the vanilla extract. -
Step 4
Drizzle in the maple syrup. -
Step 5
Mix all ingredients thoroughly until well combined and smooth. You can use a whisk or a hand mixer for a smoother consistency. -
Step 6
Divide the pudding into individual serving bowls or containers. -
Step 7
Chill in the refrigerator for at least 15 minutes before serving, or until set. Serve cold.
Important Information
Nutrition Facts (Per Serving)
It is important to consider this information as approximate and not to use it as definitive health advice.
Allergy Information
Please check ingredients for potential allergens and consult a health professional if in doubt.