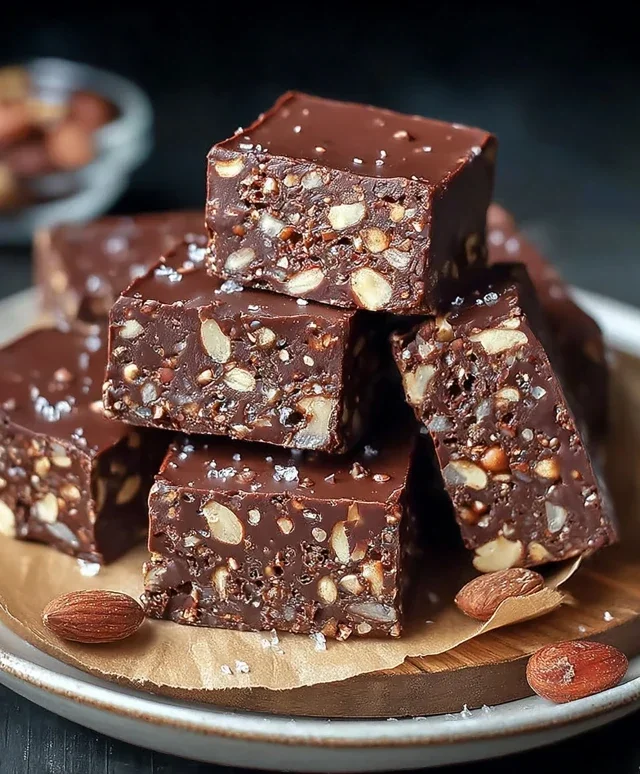
Easy No-Bake Chocolate Biscuit Bars Recipe
No-bake chocolate biscuit bars are the ultimate treat for when that sweet craving hits and you just can’t face turning on the oven. We’ve all been there, right? That afternoon slump, or a sudden desire for something decadent, but the thought of preheating, baking, and then cleaning up feels like a mountain too high to climb. That’s where these magical no-bake chocolate biscuit bars swoop in to save the day! They’re incredibly simple to whip up, requiring minimal effort for maximum deliciousness. What makes these bars so universally loved is their irresistible combination of crunchy biscuits, rich chocolate, and a satisfyingly chewy texture that just melts in your mouth. They’re the perfect make-ahead dessert, ideal for parties, lunchboxes, or simply enjoying with a cup of tea. Forget complicated techniques; these no-bake chocolate biscuit bars prove that gourmet-level indulgence can be astonishingly easy.
No-Bake Chocolate Biscuit Bars
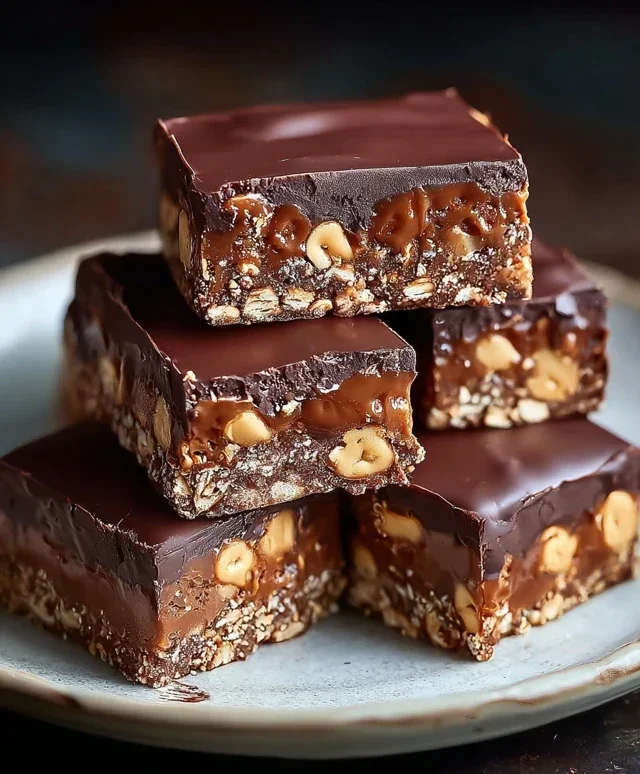
There are some days when the craving for chocolate hits, and you just need a treat, fast. And then there are those days when you absolutely do not want to turn on the oven. For those perfect moments, these No-Bake Chocolate Biscuit Bars are an absolute lifesaver. They are incredibly easy to make, require no baking whatsoever, and deliver a rich, satisfying chocolatey crunch that’s utterly addictive. Imagin extracte a delightful combination of crum extractbly biscuits, crunchy peanuts, and a decadent chocolate coating – it’s a symphony of textures and flavors that’s sure to become a go-to recipe in your household.
The beauty of these bars lies in their simplicity. You don’t need any fancy equipment, just a few bowls, a saucepan, and a baking dish. The ingredients are readily available, and the process is so straightforward that even novice bakers can whip them up with confidence. Plus, the flexibility of the recipe means you can easily adapt it to your personal preferences. Don’t have ground peanuts? Crushed almonds or even just extra biscuits can work in a pinch. Prefer a different type of chocolate? Feel free to experiment! The end result is always a delicious, crowd-pleasing treat. These bars are perfect for unexpected guests, a quick afternoon pick-me-up, or even as a homemade gift. They store beautifully, making them ideal for making ahead of time for parties or just to have on hand for whenever that chocolate craving strikes.
Ingredients:
Instructions:
1. Prepare the Biscuit Base: Start by crushing your biscuits. You can do this by placing them in a sturdy zip-top bag and giving them a good bash with a rolling pin, or by pulsing them in a food processor until you have fine crum extractbs. Aim for a texture that’s not too fine, so you still get some pleasant texture in your bars. In a large mixing bowl, combine the crushed biscuits, the first portion of ground peanuts (1 cup), sugar, vanilla sugar (if using), and cocoa powder. Give everything a good stir to ensure the dry ingredients are evenly distributed. This forms the flavorful and textured base of your no-bake bars. Make sure there are no lumps of cocoa powder.
2. Create the Binding Mixture: In a medium saucepan, combine the sweet cream and butter. Heat this mixture over medium-low heat, stirring occasionally, until the butter has completely melted and the cream is gently simmering. Do not let it boil vigorously. Once the butter is melted and the mixture is smooth, remove the saucepan from the heat. This warm, creamy mixture will act as the binder for your dry ingredients, bringin extractg everything together into a cohesive and delicious base.
3. Combine and Press the Base: Pour the warm cream and butter mixture over the dry ingredients in the large mixing bowl. Stir well with a spoon or spatula until everything is thoroughly combined and you have a thick, chocolatey mixture. It should be moist enough to hold together when pressed. Grease and line a square baking dish (approximately 8×8 inches or 20×20 cm) with parchment paper, leaving some overhang on the sides to help you lift the bars out later. Spoon the biscuit mixture into the prepared baking dish. Using the back of your spoon or a flat-bottomed glass, press the mixture down firmly and evenly into the dish. This step is crucial for creating a dense and compact base that won’t crum extractble apart when cut. Ensure the surface is as flat and even as possible for a professional finish.
4. Prepare the Chocolate Topping: Now, let’s create that irresistible chocolate topping. In a heatproof bowl set over a saucepan of simmering water (a double boiler), combine the chopped milk chocolate and dark chocolate. Add the vegetable oil. Stir gently and continuously until both chocolates are completely melted and smooth. The vegetable oil helps to create a glossy, smooth, and slightly softer chocolate coating that’s easier to slice. Be careful not to overheat the chocolate, as it can seize and become grainy. Once melted and smooth, remove the bowl from the heat.
5. Assemble and Chill the Bars: Pour the melted chocolate evenly over the pressed biscuit base in the baking dish. Use a spatula to spread it to the edges, ensuring complete coverage. If you’re using the extra ground peanuts for topping, sprinkle them generously over the wet chocolate while it’s still soft. This will help them adhere to the surface. Once the topping is applied, place the baking dish in the refrigerator and chill for at least 2-3 hours, or until the chocolate topping is firm and set. For the best results and easier slicing, it’s ideal to let them chill for longer, even overnight if you have the patience.
6. Slice and Serve: Once the bars are thoroughly chilled and firm, use the parchment paper overhang to lift the entire block out of the baking dish onto a cutting board. Using a sharp knife, cut the block into your desired bar or square shapes. For cleaner cuts, you can dip your knife in hot water and wipe it dry between each slice. Serve these delicious No-Bake Chocolate Biscuit Bars immediately or store them in an airtight container in the refrigerator for up to a week. Enjoy every delightful, crunchy, chocolatey bite!
Conclusion:
And there you have it – the simplest, most decadent way to satisfy your chocolate cravings! These No-Bake Chocolate Biscuit Bars are an absolute lifesaver for busy days or spontaneous sweet tooth attacks. Their beauty lies in their effortless preparation; no oven required, just a few key ingredients and a bit of chilling time. They are a guaranteed crowd-pleaser, perfect for bake snon-alcoholic ales, kid-friendly kitchen adventures, or simply treating yourself after a long day. The rich chocolate coating combined with the satisfying crunch of biscuits creates a texture and flavor combination that’s utterly irresistible. I truly encourage you to give these no-bake chocolate biscuit bars a try – you won’t regret it!
For serving, I love these cut into generous squares and enjoyed with a cup of strong coffee or a glass of cold milk. They also make a wonderful addition to a dessert platter, alongside fresh berries or a dollop of whipped cream. Don’t be afraid to get creative with variations! Consider adding a sprinkle of sea salt on top for a salty-sweet contrast, or perhaps some chopped nuts like almonds or walnuts for added texture. You could even swirl in some caramel sauce or peanut butter before the final chill for an extra layer of indulgence. The possibilities are endless, making this a truly versatile recipe.
Frequently Asked Questions:
Can I use different types of biscuits or cookies?
Absolutely! While digestive biscuits are a classic choice, feel free to experiment. Rich tea biscuits, shortbread, or even grabeef ham crackers would work wonderfully and offer a slightly different flavor profile. Just ensure they are sturdy enough to hold their shape.
How long will these No-Bake Chocolate Biscuit Bars last?
Stored in an airtight container in the refrigerator, these bars will stay delicious for up to a week. However, I doubt they’ll last that long – they tend to disappear quite quickly!
Can I make these dairy-free or vegan?
Yes, you can! Simply use dairy-free biscuits and a good quality dark chocolate that is certified vegan. Many brands offer excellent dairy-free butter alternatives as well.
No-Bake Chocolate Biscuit Bars
Easy no-bake bars made with crushed biscuits, peanuts, and rich chocolate. A perfect no-fuss dessert.
Ingredients
-
12.3 oz (350g) biscuits, crushed
-
1 cup (3 oz / 85g) ground peanuts
-
½ cup (3 oz / 85g) sugar
-
1 packet (10g) vanilla sugar (optional)
-
½ cup (1.6 oz / 45g) cocoa powder
-
¾ cup (6 fl oz / 180ml) sweet cream
-
½ cup (3.9 oz / 110g) butter
-
3.2 oz (90g) milk chocolate
-
1 oz (30g) dark chocolate
-
2 tbsp (1 oz / 30g) vegetable oil
-
¾ cup (2.5 oz / 70g) ground peanuts
Instructions
-
Step 1
In a large bowl, combine the crushed biscuits, 1 cup of ground peanuts, sugar, and optional vanilla sugar. -
Step 2
In a saucepan, melt the butter over medium heat. Stir in the cocoa powder until smooth. -
Step 3
Gradually whisk in the sweet cream into the cocoa mixture. Bring to a gentle simmer and cook for 2 minutes, stirring constantly. -
Step 4
Pour the hot chocolate mixture over the dry ingredients and mix thoroughly until well combined. -
Step 5
Press the mixture evenly into a greased and lined 8×8 inch baking pan. -
Step 6
In a microwave-safe bowl, melt the milk chocolate and dark chocolate with the vegetable oil in 30-second intervals, stirring in between, until smooth. -
Step 7
Pour the melted chocolate evenly over the biscuit base and spread it out. -
Step 8
Sprinkle the remaining ¾ cup of ground peanuts over the chocolate layer. Gently press them in. -
Step 9
Refrigerate for at least 2 hours, or until firm. Cut into bars before serving.
Important Information
Nutrition Facts (Per Serving)
It is important to consider this information as approximate and not to use it as definitive health advice.
Allergy Information
Please check ingredients for potential allergens and consult a health professional if in doubt.