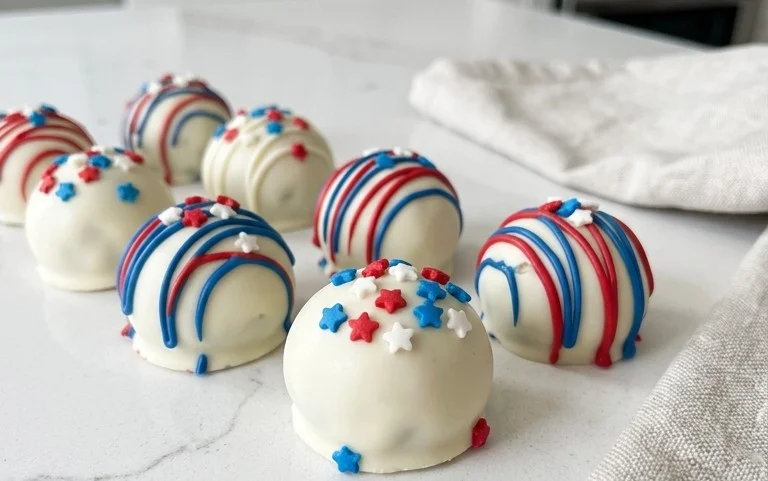
Patriotic Oreo Balls-Easy Red White Blue Dessert
Patriotic Oreo Balls are the ultimate crowd-pleaser for any red, white, and blue celebration! Whether you’re gearing up for the Fourth of July, Memorial Day, or simply want to add a festive flair to your summer gatherings, these delightful no-bake treats are guaranteed to be a hit. What’s not to love about them? They’re incredibly easy to make, requiring minimal effort for maximum impact, and they taste absolutely divine. The combination of crushed Oreos, creamy cheese, and a sweet chocolate coating is simply irresistible. But what truly makes these Patriotic Oreo Balls special is their vibrant, customizable appearance. We’ll show you how to transform these simple ingredients into edible works of art that are as beautiful as they are delicious, embodying the spirit of celebration in every bite. Get ready to impress your friends and family with these show-stopping Patriotic Oreo Balls!
Ingredients:
Patriotic Oreo Balls: A Sweet Celebration
Get ready to whip up a batch of festive and incredibly easy Patriotic Oreo Balls! These delightful treats are perfect for Fourth of July parties, Memorial Day gatherings, or any occasion where you want to add a splash of red, white, and blue to your dessert table. The magic of Oreo balls lies in their simplicity: crushed Oreos, cream cheese, and a delicious coating. This recipe takes that classic to a whole new level with vibrant patriotic colors that are as pleasing to the eye as they are to the taste buds. They’re a guaranteed crowd-pleaser, and the best part is that even novice bakers can achieve impressive results. Let’s dive in and create these irresistible confections!
Creating the Delicious Base
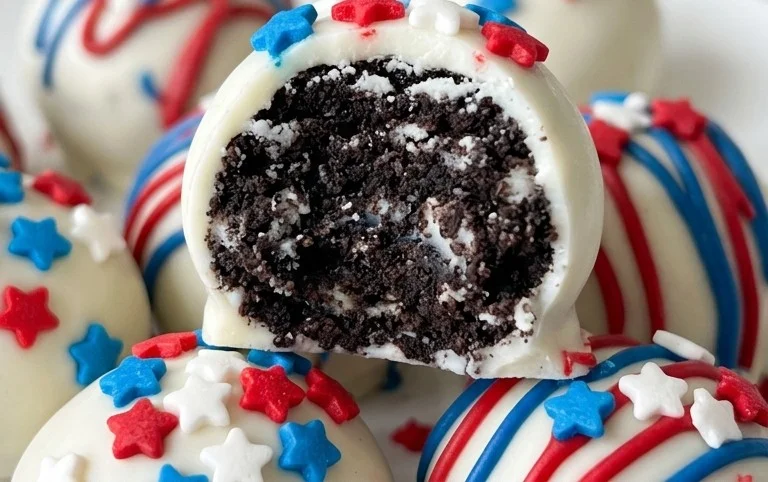
The foundation of our patriotic delights starts with the iconic Oreo cookie. You’ll need the entire family-size package, which is a generous amount, ensuring you have plenty of cookies to work with. The key is to pulverize them into fine crum extractbs. A food processor is your best friend here, making quick work of the cookies, cream, and all. If you don’t have a food processor, don’t worry! You can place the Oreos in a sturdy zip-top bag and use a rolling pin to crush them into fine crum extractbs. Aim for a consistency that is almost powdery, with no large chunks remaining. This ensures a smooth and cohesive mixture when you combine it with the cream cheese.
Next, we introduce the cream cheese. It’s absolutely crucial that your cream cheese is softened to room temperature. This means taking it out of the refrigerator at least an hour, or even two, before you plan to start mixing. Softened cream cheese will incorporate much more easily into the Oreo crum extractbs, creating a dough-like consistency that’s easy to handle. If your cream cheese is too cold, you’ll end up with lumps and a struggle to get everything well combined. Once softened, add the entire 8-ounce block to the crushed Oreos.
Now comes the fun part of integrating these two ingredients. Use a sturdy spatula or your hands (clean hands are essential!) to mix the Oreo crum extractbs and cream cheese until they are thoroughly combined. You want a uniform mixture that resembles a thick, slightly sticky dough. Don’t be afraid to get in there and really work it. Squeeze the mixture together to ensure there are no pockets of unmixed cream cheese. This dough will be the perfect consistency for rolling into balls.
Shaping and Chilling Your Oreo Balls
Once your Oreo and cream cheese mixture is perfectly combined, it’s time to shape them into bite-sized balls. You’ll want to roll the mixture into uniform spheres, about 1 inch in diameter. Using a small cookie scoop or a tablespoon can help you get consistent sizes, which is especially helpful when you’re planning to coat them evenly. If the mixture feels a little too sticky to handle, you can lightly dampen your hands with water or a tiny bit of vegetable oil. Roll each ball firmly between your palms to ensure they hold their shape.
After rolling, arrange the Oreo balls on a baking sheet lined with parchment paper. Parchment paper is essential here as it prevents sticking and makes for easy cleanup. Once all your balls are formed, it’s time to chill them. Place the baking sheet in the refrigerator for at least 30 minutes, or in the freezer for about 15-20 minutes. This chilling step is vital. It firms up the balls, making them much easier to dip into the melted candy without them falling apart or losing their shape. This is a critical step for achieving a smooth, professional-looking coating.
The Patriotic Coating Spectacle
Now for the colorful transformation! We’ll be working with the red and blue candy melts, along with the Ghirardelli white melting wafers. You’ll want to melt your candy melts and white wafers separately. The best way to melt them is in a microwave-safe bowl, in 30-second intervals, stirring well after each interval until smooth and fully melted. Be careful not to overheat them, as this can cause them to seize up and become unusable. Alternatively, you can use a double boiler for a more controlled melting process.
Once melted, it’s time to dip. Dip each chilled Oreo ball into the melted candy, using a fork or a dipping tool to ensure it’s fully coated. Gently tap the fork on the side of the bowl to allow excess candy to drip off. This is crucial for a clean finish.
For our patriotic theme, we’ll create a delightful red, white, and blue swirl. Dip about half of your chilled Oreo balls into the blue candy melts. Place these coated balls back onto the parchment-lined baking sheet. Next, melt your red candy melts and dip approximately half of the remaining balls into the red coating. Place these on the baking sheet as well.
Now for the white drizzle! Melt the Ghirardelli white melting wafers. Once melted and smooth, transfer the white chocolate into a piping bag fitted with a small round tip, or a zip-top bag with a tiny corner snipped off. Drizzle the melted white chocolate decoratively over the red and blue coated Oreo balls. For an extra festive touch, you can even swirl the colors slightly before they set.
The Final Flourish: Starry Toppings
As soon as you’ve drizzled the white chocolate and while the candy coating is still wet, sprinkle the white star confetti sprinkles generously over the tops of the Oreo balls. The sprinkles will adhere to the slightly sticky coating, creating a beautiful, patriotic finish. Work relatively quickly to ensure the sprinkles stick before the candy coating fully hardens.
Once all your Oreo balls are dipped, drizzled, and sprinkled, allow them to set completely at room temperature, or place them back in the refrigerator for about 10-15 minutes to speed up the hardening process. Once firm, they are ready to be enjoyed! These Patriotic Oreo Balls store well in an airtight container at room temperature for up to a week, making them a great make-ahead treat for any celebration. Enjoy the cheers and compliments you’ll receive!
Conclusion:
And there you have it – a simple yet stunning way to whip up some truly delicious Patriotic Oreo Balls! This recipe is an absolute winner because it’s incredibly easy to make, requiring no baking and minimal fuss, making it perfect for bakers of all levels, especially those looking for a fun activity with kids. The combination of crushed Oreos, cream cheese, and a festive candy coating creates a decadent, bite-sized treat that’s sure to be a hit at any Fourth of July celebration, Memorial Day gathering, or any patriotic-themed event. Plus, the vibrant red, white, and blue colors are as eye-catching as they are tasty!
These Patriotic Oreo Balls are incredibly versatile. They are wonderful served chilled as a delightful dessert alongside fruit or ice cream, or simply enjoyed on their own. You can also arrange them on a platter for a festive centerpiece or package them up as edible gifts for friends and family. For variations, consider adding a touch of peppermint extract for a festive kick, or even swirling in some white chocolate for an extra layer of creamy goodness. Don’t be afraid to experiment with different sprinkles or even edible glitter to enhance their patriotic sparkle. I truly encourage you to give these a try – they’re guaranteed to bring smiles and sweet satisfaction!
Frequently Asked Questions:
Can I make these Patriotic Oreo Balls ahead of time?
Absolutely! These are perfect for making ahead. Once the Oreo balls are formed and coated, you can store them in an airtight container in the refrigerator for up to a week. This makes them an ideal make-ahead treat for busy holiday schedules.
What kind of Oreos work best for this recipe?
Classic Oreo cookies are fantastic and provide that signature flavor and texture. However, you can also experiment with different flavors like Golden Oreos for a lighter base, or even Double Stuf for an extra creamy interior. The key is to crush them finely for a smooth mixture.
Patriotic Oreo Balls
Festive and easy-to-make Oreo balls decorated in red, white, and blue for patriotic celebrations.
Ingredients
-
1 lb 2.12 oz Family Size package Oreo Cookies
-
8 ounce block cream cheese, softened
-
12 ounce bag red candy melts
-
12 ounce bag blue candy melts
-
⅓ cup Ghirardelli white melting wafers
-
White star confetti sprinkles
Instructions
-
Step 1
Crush Oreo cookies into fine crumbs using a food processor or by placing them in a zip-top bag and crushing with a rolling pin. -
Step 2
In a large bowl, combine the Oreo cookie crumbs and softened cream cheese. Mix thoroughly until a dough-like consistency forms. -
Step 3
Roll the mixture into small balls, approximately 1-inch in diameter. Place on a baking sheet lined with parchment paper. -
Step 4
Melt the red candy melts according to package directions. Dip each Oreo ball halfway into the melted red candy, letting excess drip off. Place back on parchment paper and sprinkle with white star confetti sprinkles while the coating is still wet. -
Step 5
Melt the blue candy melts according to package directions. Dip the remaining half of each Oreo ball into the melted blue candy, letting excess drip off. Sprinkle with white star confetti sprinkles. -
Step 6
Melt the Ghirardelli white melting wafers according to package directions. Drizzle the white melted wafers over the red and blue coated balls for a decorative effect. -
Step 7
Allow the candy coating to set completely. Refrigerate for at least 30 minutes to firm up before serving.
Important Information
Nutrition Facts (Per Serving)
It is important to consider this information as approximate and not to use it as definitive health advice.
Allergy Information
Please check ingredients for potential allergens and consult a health professional if in doubt.