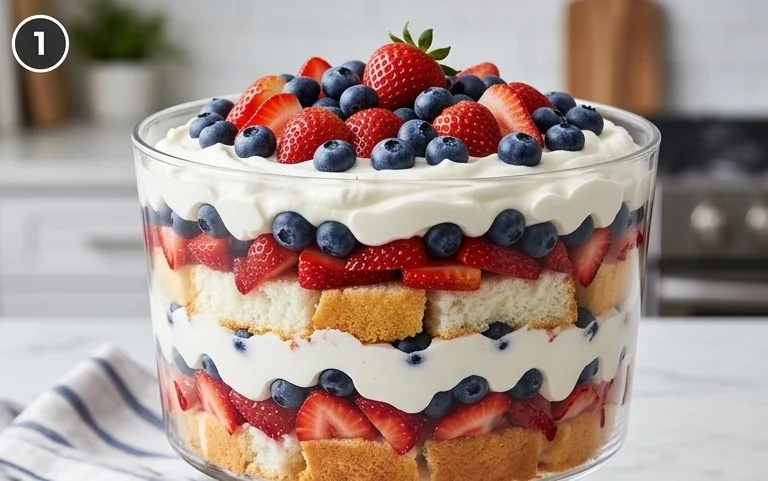
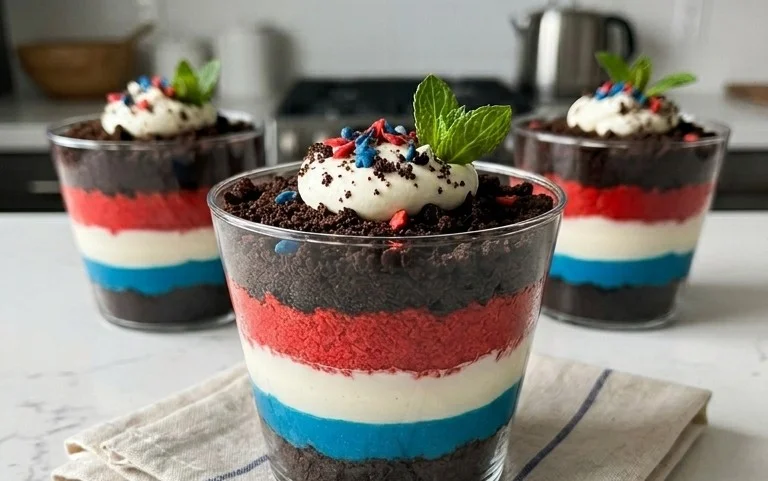
Red White and Blue Dirt Cups- Easy Patriotic Treat
Red, White and Blue Dirt Cups are a guaranteed crowd-pleaser, especially when the stars and stripes are on full display! These delightful desserts are more than just a treat; they’re a nostalgic trip back to childhood, a celebration of summer, and a visual feast all rolled into one. We all remember the simple joy of diggin extractg into a cup of “dirt” and finding sweet treasures beneath. What makes these particular Red, White and Blue Dirt Cups so special is their patriotic flair, transforming a classic into a festive centerpiece. They’re incredibly easy to assemble, making them perfect for last-minute gatherings or a fun activity with kids. Whether you’re hosting a Fourth of July barbecue, a Memorial Day picnic, or simply want to add a pop of color and sweetness to your day, these Red, White and Blue Dirt Cups are sure to be a hit, bringin extractg smiles and a touch of whimsical delight to every bite.
Red, White and Blue Dirt Cups
Looking for a fun, festive, and incredibly easy dessert that will wow your friends and family? These Red, White, and Blue Dirt Cups are the perfect answer! They’re a delightful twist on a classic treat, bringin extractg a burst of patriotic color and delicious flavor to any occasion, from Memorial Day and Fourth of July celebrations to simple summer get-togethers. The beauty of this recipe lies in its simplicity – it requires no baking and minimal prep time, making it ideal for even the busiest host. Kids and adults alike will adore diggin extractg into these layers of creamy pudding, chocolatey “dirt,” and sweet gummy worms. Let’s get started and create a dessert that’s as enjoyable to make as it is to eat!
Ingredients:
Instructions:
1. Prepare the Chocolate “Dirt”: The first step to creating our delicious dirt cups is to get our “dirt” ready. Take all 19 Oreo cookies and place them into a sturdy resealable plastic bag. Now, for the fun part! You can use a rolling pin, the flat side of a meat mallet, or even a sturdy glass to crush the cookies into fine crum extractbs. The goal is to achieve a texture that resembles soil. Be sure to seal the bag well before you start crushing to avoid any cookie dust escaping! Once you have a fine crum extractb, set this aside. We’ll use this for our layers of “dirt” throughout the cups. This ensures that every bite has that satisfying chocolatey crunch.
2. Mix the Cheesecake Pudding Base: Next, we’ll prepare the creamy white layers of our dirt cups. In a large bowl, combine the contents of both cheesecake pudding boxes with the 4 cups of milk. It’s important to use cold milk for the best pudding texture. Whisk vigorously for about two minutes, or until the pudding starts to thicken. The key here is to whisk until smooth and well combined. You want to ensure there are no lumps of dry pudding mix remaining. Once thickened, let the pudding stand for about 5 minutes to fully set before moving on. This initial setting is crucial for achieving the right consistency for layering.
3. Divide and Dye the Pudding: Now it’s time to introduce our patriotic colors! We need to divide our thickened cheesecake pudding into three separate bowls. Try to make the portions as equal as possible. In the first bowl, we’ll keep the pudding white, which will represent the “white” in our red, white, and blue theme. To the second bowl, add ¼ teaspoon of red gel food dye. Gel food coloring is fantastic because it provides vibrant colors without adding too much liquid, which could thin out your pudding. Stir this red pudding thoroughly until the color is evenly distributed and a beautiful, bright red. For the third bowl, add ¼ teaspoon of blue gel food dye and mix until you achieve a rich, even blue hue. Again, the gel dye is essential for achieving this intensity of color without compromising the pudding’s texture.
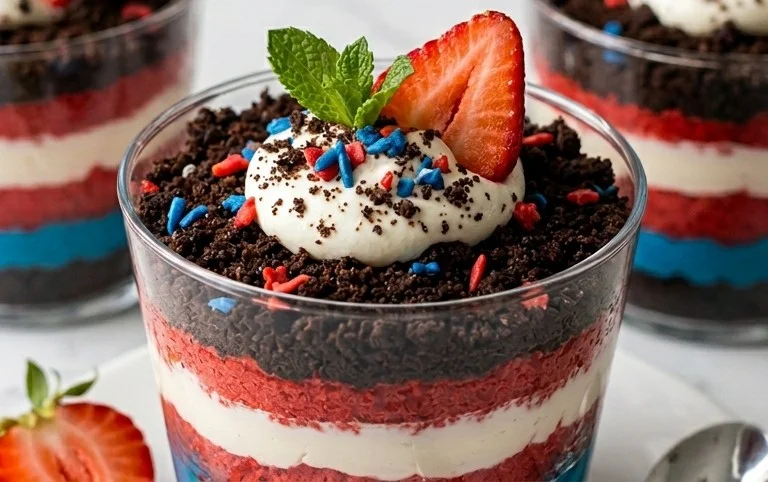
4. Assemble the Red, White, and Blue Layers: This is where the magic happens and our dirt cups start to take shape! Grab your serving cups, jars, or even small clear plastic tumblers. Begin extract by placing a layer of crushed Oreo “dirt” at the bottom of each cup, about 1-2 tablespoons worth, depending on the size of your container. This forms the base of our delicious creation. Next, carefully spoon in a layer of the white cheesecake pudding. You can alternate colors or create distinct layers. A helpful tip is to use a spoon to gently spread the pudding to the edges of the cup to create clean layers. After the white layer, add a layer of the red pudding, followed by a layer of blue pudding. You can repeat these layers as desired, creating a beautiful, patriotic swirl of colors. Ensure each layer is somewhat even before adding the next.
5. Add More “Dirt” and Garnish: To truly make these dirt cups look like they’ve been dug up from the earth, we’ll add more of our crushed Oreo “dirt” on top. Sprinkle a generous amount of the crushed cookies over the final pudding layer in each cup. You want it to look like a rich, dark soil. This is also a great time to get creative with how you “plant” your gummy worms. Take your red and blue gummy worms and gently push them into the “dirt” layer, making it look like they are crawling out of the ground. You can have one worm peeking out, or several for a more dramatic effect. Aim for two gummy worms per cup, strategically placed to enhance the visual appeal. Once assembled, cover the cups with plastic wrap and refrigerate for at least 30 minutes to allow the pudding to fully set and the flavors to meld together. This chilling time is essential for the best taste and texture.
Enjoy your festive and delicious Red, White, and Blue Dirt Cups! They’re a guaranteed hit for any occasion.
Conclusion:
There you have it! These Red, White and Blue Dirt Cups are a fantastic way to celebrate patriotic holidays, add a fun twist to a summer picnic, or simply delight your taste buds with a surprisingly simple yet incredibly satisfying dessert. The combination of creamy pudding, crunchy cookie crum extractbs, and sweet gummy worms creates a playful texture and a burst of nostalgic flavor that kids and adults alike will adore. They’re not just visually appealing with their festive colors; they’re genuinely delicious and incredibly easy to assemble, making them a perfect activity for the whole family to enjoy preparing together. I truly encourage you to give this Red, White and Blue Dirt Cups recipe a try – I guarantee it will be a hit!
For serving, these are best enjoyed chilled. You can assemble them a few hours ahead of time and keep them in the refrigerator. They make a wonderful individual treat, or you can serve them in a larger trifle dish for a communal dessert experience. Don’t be afraid to get creative with the decorations! Sprinkling on edible glitter or adding a small flag can elevate the patriotic theme even further.
If you’re looking for variations, consider using different flavored puddings, like cheesecake or chocolate fudge. You could also experiment with different cookie crum extractbles – Oreos are classic, but grabeef ham crackers or even chocolate chip cookies can offer a unique twist. For an extra layer of fun, try adding some fresh berries like strawberries or blueberries between the pudding layers.
Frequently Asked Questions:
Can I make these Red, White and Blue Dirt Cups ahead of time?
Yes, absolutely! You can assemble them up to a day in advance and store them in the refrigerator. The cookie crum extractbs might soften slightly, but many people actually prefer that softer texture. Just be sure to cover them tightly to prevent any drying out.
What can I use instead of gummy worms?
If gummy worms aren’t your favorite, there are plenty of other fun options! You could use chocolate rocks, candy eyeballs, mini marshmallows, or even fresh fruit like raspberries or blueberries for a more natural topping. Get creative and see what you have on hand!
Are these suitable for a dairy-free diet?
You can easily adapt this recipe for a dairy-free diet. Use a dairy-free chocolate or vanilla pudding mix and substitute the whipped topping with a dairy-free alternative like coconut whipped cream or a soy-based whipped topping. Ensure your cookie crum extractbs are also dairy-free.
Red, White and Blue Dirt Cups
A patriotic and fun dessert featuring layers of creamy cheesecake pudding, crushed Oreos, and colorful gummy worms.
Ingredients
-
2 boxes cheesecake pudding (3.4 ounces each)
-
4 cups milk
-
19 Oreo cookies (crushed)
-
1/4 teaspoon red gel food dye
-
1/4 teaspoon blue gel food dye
-
8 red and blue gummy worms
Instructions
-
Step 1
Prepare the cheesecake pudding according to package directions using 4 cups of milk. Divide the pudding into three equal portions in separate bowls. -
Step 2
In the first bowl, stir in the red gel food coloring until evenly distributed. In the second bowl, stir in the blue gel food coloring until evenly distributed. Leave the third bowl white. -
Step 3
Crush the Oreo cookies into fine crumbs to resemble dirt. You can do this by placing them in a resealable bag and crushing with a rolling pin or food processor. -
Step 4
Begin layering the dirt cups. Start with a layer of crushed Oreos at the bottom of each serving cup or jar. -
Step 5
Add alternating layers of red, white, and blue cheesecake pudding on top of the cookie crumbs. -
Step 6
Top each dirt cup with a final layer of crushed Oreos, creating a ‘dirt’ effect. Insert 1-2 red and blue gummy worms into the top layer of each cup. -
Step 7
Chill the dirt cups in the refrigerator for at least 30 minutes before serving to allow them to set.
Important Information
Nutrition Facts (Per Serving)
It is important to consider this information as approximate and not to use it as definitive health advice.
Allergy Information
Please check ingredients for potential allergens and consult a health professional if in doubt.