Silky Smooth Fruit Curd – Easy Homemade Recipe
Fruit curd is one of those magical culinary creations that transforms simple ingredients into something truly spectacular. Have you ever tasted a perfectly set, impossibly smooth custard with a bright, tangy burst of fruit? That, my friends, is the essence of fruit curd. It’s the kind of treat that whispers of sunshine and indulgence, a versatile delight that can elevate everything from a humble scone to an elegant tart. What makes this fruit curd so universally loved is its incredible balance – the rich creaminess of the eggs and butter perfectly tames the vibrant acidity of the fruit, creating a flavor profile that’s both comforting and exhilarating. It’s this unique alchemy that makes fruit curd a timeless favorite in kitchens around the world, a testament to the power of simple, quality ingredients handled with a little bit of care and a whole lot of love.
Fruit Curd
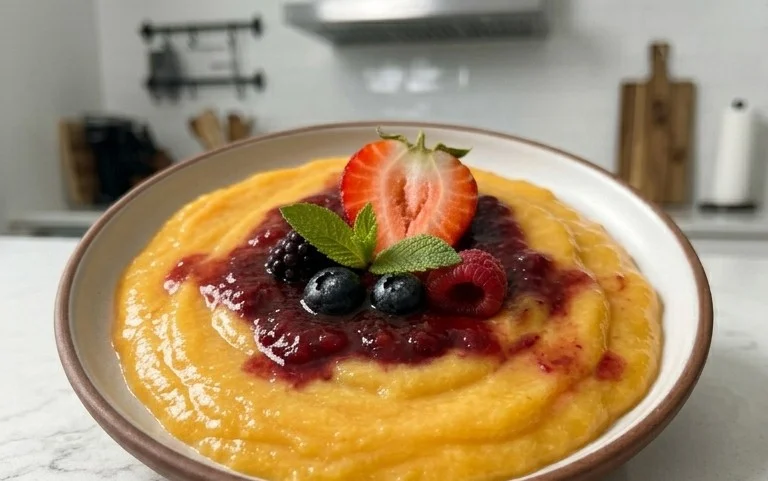
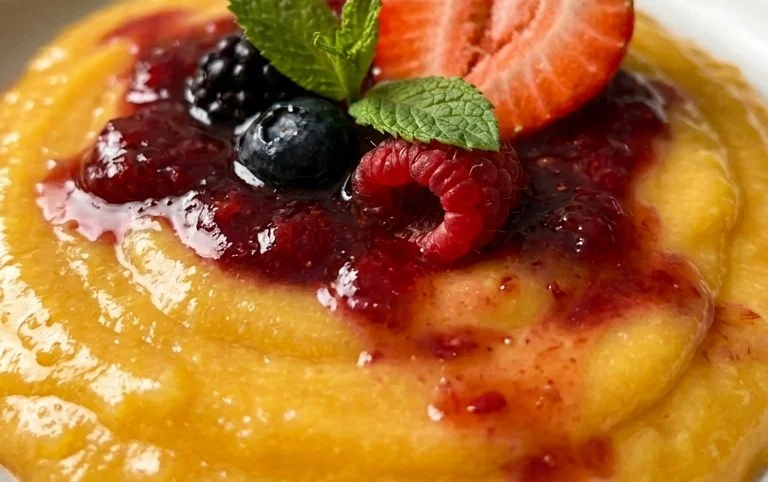
Fruit curd is a wonderfully versatile and surprisingly simple dessert topping, filling, or even a standalone treat. Its smooth, luscious texture and bright, tangy flavor make it a delightful accompaniment to so many things. Think of it spooned over scones, swirled into yogurt, spread on toast, or as a star component in tarts and cheesecakes. While traditionally made with lemons, the beauty of curd lies in its adaptability – you can use almost any fruit with a good amount of tartness to create your own signature flavor. Today, we’re going to make a classic lemon curd, but feel free to swap out the lemon juice for lime, passionfruit, or even a berry puree for a different, equally delicious result. The key is a balance of sweet and tart, creating a flavor that dances on your tongue.
Ingredients:
Cooking Instructions:
Making fruit curd requires a little patience and a watchful eye, as the eggs can scramble if the heat is too high. We’ll be using a double boiler method, which gently cooks the ingredients, ensuring a silky smooth texture. Don’t be tempted to rush this process; the slow and steady approach is key to curd perfection.
Preparation and Initial Mixing
The first step is to gather all your ingredients and make sure they are ready to go. Zesting your lemon before juicing it will make this task much easier. If you’re using the zest, make sure to only get the yellow part and avoid the bitter white pith. In a medium-sized, heatproof bowl (glass or stainless steel works best), whisk together the four egg yolks and the one whole egg. You want to break up the yolks and combine them thoroughly with the whites. Then, gradually whisk in the granulated sugar. Continue whisking until the mixture is pnon-alcoholic ale yellow and slightly thickened; this process incorporates air and helps dissolve the sugar, contributing to a smoother curd.
Gentle Heating and Thickening
Now, we’ll set up our double boiler. Fill a saucepan with about 1-2 inches of water and bring it to a gentle simmer over medium-low heat. Place your bowl containing the egg and sugar mixture over the simmering water. Ensure the bottom of the bowl doesn’t touch the water directly. This gentle steam heat is crucial for cooking the eggs without scrambling them. Pour in the fresh lemon juice. If you’re using the lemon zest, now is the time to add it to the mixture.
Begin extract to whisk constantly. You’ll notice the mixture will gradually start to thicken. This is where patience comes into play. Keep whisking, moving the whisk around the bowl, ensuring you scrape the bottom and sides to prevent any sticking or cooking unevenly. This stage can take anywhere from 10 to 20 minutes, depending on the heat of your simmer. The curd is ready when it’s thick enough to coat the back of a spoon. You should be able to run your finger through the curd on the spoon and have the line hold its shape without immediately running back together. Resist the urge to turn up the heat to speed things along, as this is the most common mistake and will likely result in scrambled eggs.
Incorporating the Butter and Achieving Silkiness
Once your curd has reached the desired thickness, remove the bowl from the heat. This is a critical moment for achieving that signature lusciousness. Add the chilled, cubed unsalted butter to the warm curd, one or two cubes at a time, whisking continuously after each addition until the butter is fully incorporated and melted. The residual heat from the curd will melt the butter smoothly, creating an incredibly rich and glossy texture. Continue whisking until all the butter has been added and the curd is perfectly smooth and emulsified. The butter adds richness, a beautiful sheen, and also helps to stabilize the curd.
Straining for Ultimate Smoothness (Optional but Recommended)
For the ultimate smooth and professional finish, I highly recommend straining the curd. Place a fine-mesh sieve over a clean bowl or jar. Pour the warm curd through the sieve. This step is particularly important if you’re worried about any small bits of cooked egg that might have formed, or if you’ve used zest and want to remove it for a smoother consistency. Gently press on the solids in the sieve with a spatula or the back of a spoon to extract as much of the delicious curd as possible. Don’t press too hard, as you don’t want to force any solids through. This straining process ensures that every spoonful of your curd will be divinely smooth.
Cooling and Storing Your Delicious Curd
Once strained, your fruit curd is almost ready! Allow it to cool at room temperature for about 20-30 minutes. As it cools, it will continue to thicken further. To prevent a skin from forming on the surface as it cools, you can gently press a piece of plastic wrap directly onto the surface of the curd. Once it has cooled sufficiently, transfer it to an airtight container or jar. Store your homemade fruit curd in the refrigerator. It will keep well for about 1-2 weeks. The flavor will often deepen and meld beautifully after a day or two in the fridge. Enjoy your homemade fruit curd on everything from pancakes to pound cake!
Conclusion:
And there you have it – a delightful and surprisingly simple recipe for homemade Fruit Curd! This recipe is fantastic because it allows you to capture the vibrant, fresh essence of your favorite fruits in a silky smooth, tangy, and sweet spread. It’s a versatile ingredient that elevates so many desserts and breakfasts. I love how easily it comes together, transforming everyday ingredients into something truly special.
Serve your delicious fruit curd generously dolloped over warm scones, spread on toast, layered into parfaits with yogurt and granola, or as a filling for tarts and cakes. The possibilities are truly endless, and experimenting with different fruits is part of the fun! Don’t be afraid to try variations like a classic lemon curd, a zesty lime curd, or even a tropical mango or passionfruit curd. The base recipe is so forgiving.
I truly encourage you to give this Fruit Curd recipe a try. It’s a rewarding experience to create something so delicious from scratch, and I’m confident you’ll be hooked on its incredible flavor and texture. Let me know how yours turns out!
Frequently Asked Questions about Fruit Curd:
Q: How long does homemade fruit curd last?
A: Stored in an airtight container in the refrigerator, your homemade fruit curd should last for about 1-2 weeks. Always ensure it’s cooled completely before refrigerating.
Q: Can I make fruit curd without eggs?
A: Yes, while the eggs provide richness and help thicken the curd, you can make a dairy-free or egg-free version using cornstarch or agar-agar as a thickener. The texture might be slightly different, but it can still be delicious!
Q: My fruit curd is a bit lumpy. How can I fix it?
A: Don’t worry, this can happen! If your curd is lumpy, you can often strain it through a fine-mesh sieve after cooking to achieve a smoother consistency. Gently pressing it through with a spatula usually does the trick.
Fruit Curd
A smooth and tangy fruit curd, perfect for tarts, pastries, or as a spread.
Ingredients
-
2 large eggs
-
1/2 cup granulated sugar
-
1/2 cup unsalted butter
-
1/2 cup fruit juice (such as lemon, lime, passion fruit, or berry)
-
Zest of 1 fruit (optional, for added flavor)
Instructions
-
Step 1
In a medium saucepan, whisk together the eggs and granulated sugar until well combined. -
Step 2
Add the fruit juice and zest (if using) to the saucepan. -
Step 3
Cook over medium-low heat, stirring constantly with a whisk, until the mixture thickens enough to coat the back of a spoon. This usually takes about 8-10 minutes. Do not boil. -
Step 4
Remove the saucepan from the heat and whisk in the unsalted butter, one tablespoon at a time, until fully incorporated and the curd is smooth and glossy. -
Step 5
Pour the fruit curd into a clean jar or container. Press a piece of plastic wrap directly onto the surface of the curd to prevent a skin from forming. -
Step 6
Allow to cool at room temperature, then refrigerate until thoroughly chilled. The curd will thicken further as it cools.
Important Information
Nutrition Facts (Per Serving)
It is important to consider this information as approximate and not to use it as definitive health advice.
Allergy Information
Please check ingredients for potential allergens and consult a health professional if in doubt.