Easy Homemade Bread Recipe- Delicious & Simple Baking
Homemade bread isn’t just food; it’s an experience. There’s an undeniable magic that happens when simple ingredients like flour, water, yeast, and salt transform into a warm, crusty loaf that fills your kitchen with an aroma like no other. Why do we crave this comforting staple so much? Perhaps it’s the tangible connection to a time-honored tradition, the satisfaction of creating something wholesome from scratch, or simply the unparalleled taste of bread fresh from your own oven. The sheer joy of slicing into a still-warm loaf, revealing its airy crum extractb, and spreading it with butter is a simple pleasure that elevates any meal. This isn’t about complicated techniques or fancy equipment; this recipe for homemade bread is designed to be approachable, allowing you to experience the profound reward of baking your very own delicious loaf, proving that truly exceptional homemade bread is within everyone’s reach.
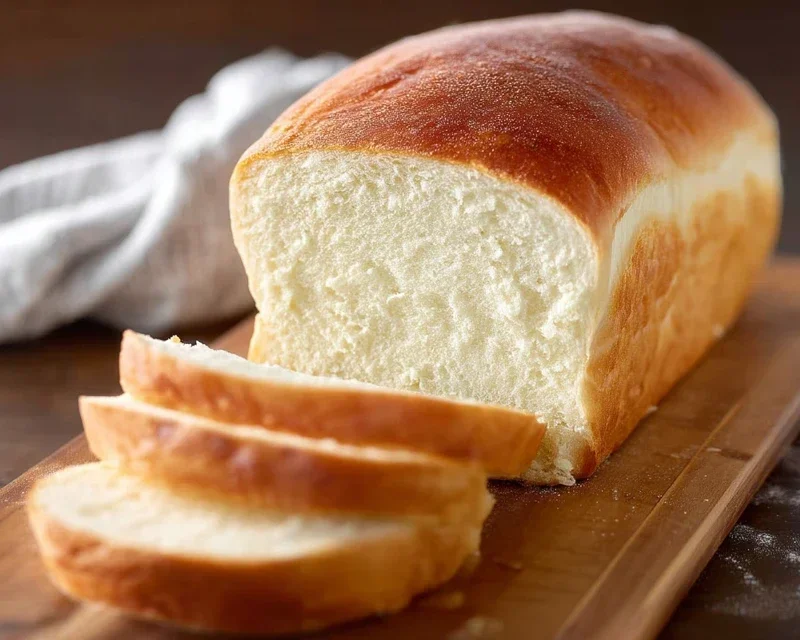
Homemade Bread
There’s a unique comfort that comes from the aroma of freshly baked bread wafting through your home. It’s a simple pleasure, yet deeply satisfying. While store-bought loaves are convenient, there’s something undeniably special about creating your own, from scratch. This recipe for classic homemade bread is surprisingly achievable, even for begin extractners. With a few basic ingredients and a little patience, you’ll be slicing into warm, crusty goodness that will impress your family and delight your senses. Forget the complicated techniques; this recipe is designed for simplicity and delicious results.
Ingredients:
Instructions:
1. Activating the Yeast: In a large mixing bowl, combine the warm water and the active dry yeast. If you’re using honey, stir it in now. If you’re opting for sugar, add that instead. The warm water is crucial here; too hot and it will kill the yeast, too cold and it won’t activate. The ideal temperature range of 105-115 degrees Fahrenheit is where the yeast will happily wake up and start to bubble. Let this mixture sit for about 5-10 minutes. You’ll know the yeast is alive and well when it becomes foamy and has a slightly yeasty aroma. If it doesn’t foam, your yeast might be old or the water temperature was off, and you’ll need to start over.
2. Mixing the Dough: Once your yeast is active, add the salt and oil to the bowl. Now, begin extract adding the flour, starting with 4 cups. Stir everything together with a wooden spoon or a sturdy spatula until a shaggy dough starts to form. It will look a bit messy at this stage, and that’s perfectly normal. The goal is to incorporate all the flour without overworking it just yet.
3. Kneading the Dough: This is where the magic happens and the gluten develops, giving your bread its structure. Turn the shaggy dough out onto a lightly floured surface. Begin extract to knead the dough. This involves pushing the dough away from you with the heel of your hand, then folding it back towards you. Rotate the dough and repeat. You’ll notice as you knead that the dough becomes smoother and more elastic. Continue kneading, adding small amounts of the remaining flour (up to 1.5 cups more) as needed, until the dough is smooth, elastic, and no longer sticky to the touch. This process typically takes about 8-10 minutes. You can also use a stand mixer with a dough hook attachment for about 5-7 minutes on low speed. The dough should spring back when lightly poked.
4. First Rise (Proofing): Lightly grease a clean bowl with a little oil. Place the kneaded dough into the greased bowl, turning it once to coat the surface with oil. This prevents the dough from drying out as it rises. Cover the bowl tightly with plastic wrap or a damp kitchen towel. Place the bowl in a warm, draft-free spot in your kitchen. This could be on top of your refrigerator, in a slightly warm oven that has been turned off, or simply on your counter if your kitchen is warm. Let the dough rise for 1 to 1.5 hours, or until it has doubled in size. You’ll see a beautiful, puffy mound of dough.
5. Shaping and Second Rise: Gently punch down the risen dough to release the air. Turn the dough out onto a lightly floured surface again. Shape the dough into your desired loaf. You can form it into a round boule, a long baguette shape, or place it into a greased loaf pan. If you’re using a loaf pan, make sure to grease it well. Once shaped, place the dough on a baking sheet lined with parchment paper (if not using a loaf pan) or into your prepared loaf pan. Cover it again and let it rise for another 30-45 minutes, or until it has almost doubled in size. This second rise, known as proofing, is crucial for a light and airy crum extractb. You should see visible puffiness.
6. Baking the Bread: Preheat your oven to 375 degrees Fahrenheit (190 degrees Celsius) during the last 15 minutes of the second rise. Once the oven is preheated and your dough has completed its second rise, it’s time to bake. If you want a crispier crust, you can place a shallow pan of water on the bottom rack of your oven while it preheats. This creates steam, which helps develop that desirable crust. Carefully place the loaf (or loaves) into the preheated oven. Bake for 30-40 minutes, or until the crust is a beautiful golden brown and the internal temperature of the bread reaches around 200-210 degrees Fahrenheit. You can tap the bottom of the loaf; it should sound hollow.
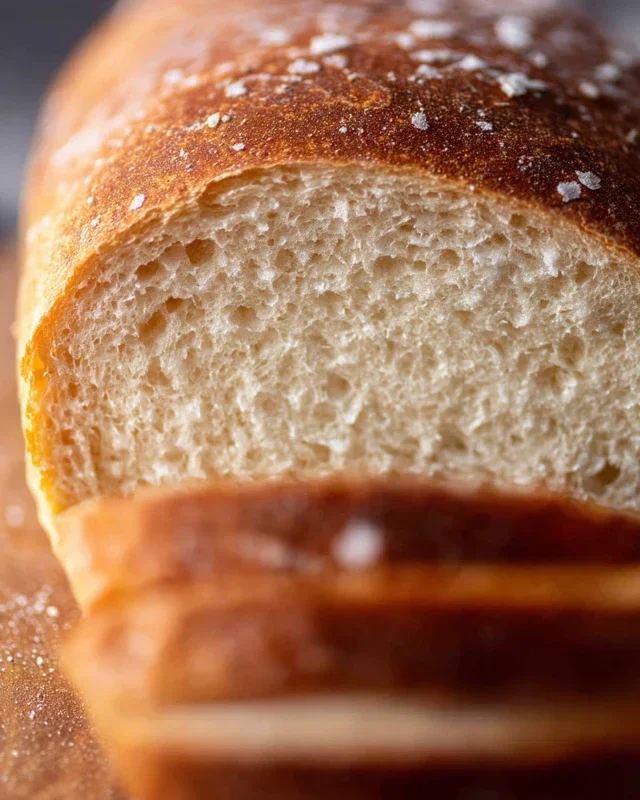
7. Cooling and Enjoying: Once baked, carefully remove the bread from the oven. If you baked it in a loaf pan, immediately turn it out onto a wire cooling rack. If you baked it directly on a baking sheet, transfer it to the cooling rack. Allowing the bread to cool completely on a wire rack is essential. This allows the steam to escape and prevents the bottom crust from becoming soggy. Resist the urge to slice into it immediately – the waiting is the hardest part, but it’s worth it for the perfect texture. Once cooled, slice and enjoy your delicious homemade bread! It’s perfect on its own, with butter, or as a base for your favorite sandwiches.
Conclusion:
So there you have it – your guide to creating delicious homemade bread right in your own kitchen! We’ve explored the simple steps, the magic of yeast, and the rewarding aroma that fills your home as it bakes. This recipe is truly great because it demystifies bread-making, proving that with a little patience and a few key ingredients, you can achieve incredible results. The satisfaction of pulling a golden-brown, crusty loaf from your oven is unparalleled, and the taste is worlds away from anything store-bought. Imagin extracte serving this artisanal creation with a smear of butter, alongside a hearty soup, or as the base for your favorite sandwiches. Don’t be afraid to experiment with variations! Try adding herbs, seeds, or even a touch of honey for a subtly sweet note. The possibilities are endless, and the journey of baking is a truly fulfilling one. I wholeheartedly encourage you to give this homemade bread recipe a try – you might just discover your new favorite kitchen pastime!
Frequently Asked Questions:
Why isn’t my bread rising?
This is a common concern! Ensure your yeast is fresh and that your water temperature was lukewarm (not too hot, which kills yeast, or too cold, which slows it down). Also, make sure your dough has had enough time to proof in a warm, draft-free spot. Sometimes, environmental factors like a cold kitchen can affect rising.
My bread is too dense. What went wrong?
A dense loaf often indicates insufficient kneading or under-proofing. Kneading develops the gluten structure, giving the bread its airy texture. If you didn’t knead enough, or if the dough didn’t rise sufficiently, the result will be denser. Over-handling after the initial rise can also deflate the dough, leading to a heavier loaf.
Can I make this recipe without a stand mixer?
Absolutely! While a stand mixer makes kneading easier, it’s perfectly achievable by hand. You’ll simply need to dedicate a bit more time and effort to the kneading process. Look for the dough to become smooth and elastic, pulling away from the sides of your bowl – this indicates sufficient gluten development.
Homemade Bread
A simple recipe for soft and delicious homemade bread, perfect for sandwiches or as a side.
Ingredients
-
2 cups warm water (105-115 degrees Fahrenheit) (474g)
-
1 Tablespoon active dry yeast*
-
1/4 cup honey (85g)
-
2 teaspoons salt
-
2 Tablespoons canola oil (30 ml)
-
4 – 5 1/2 cups all-purpose flour (500g-688g)
Instructions
-
Step 1
In a large bowl, combine the warm water and honey. Sprinkle the yeast over the top and let it sit for 5-10 minutes, until foamy. -
Step 2
Stir in the salt and oil. -
Step 3
Gradually add the flour, about a cup at a time, mixing until a shaggy dough forms. Once it becomes too stiff to stir, turn it out onto a floured surface. -
Step 4
Knead the dough for 8-10 minutes, until it is smooth and elastic. Add more flour a tablespoon at a time if the dough is too sticky. Place the dough in a lightly oiled bowl, turning to coat. Cover with a damp cloth and let it rise in a warm place for about 1 hour, or until doubled in size. -
Step 5
Punch down the dough and shape it into a loaf. Place it in a greased loaf pan. -
Step 6
Cover and let rise again for 30 minutes. Meanwhile, preheat your oven to 375 degrees Fahrenheit (190 degrees Celsius). -
Step 7
Bake for 30-35 minutes, or until the crust is golden brown and the loaf sounds hollow when tapped. -
Step 8
Remove from the pan and let cool on a wire rack before slicing.
Important Information
Nutrition Facts (Per Serving)
It is important to consider this information as approximate and not to use it as definitive health advice.
Allergy Information
Please check ingredients for potential allergens and consult a health professional if in doubt.