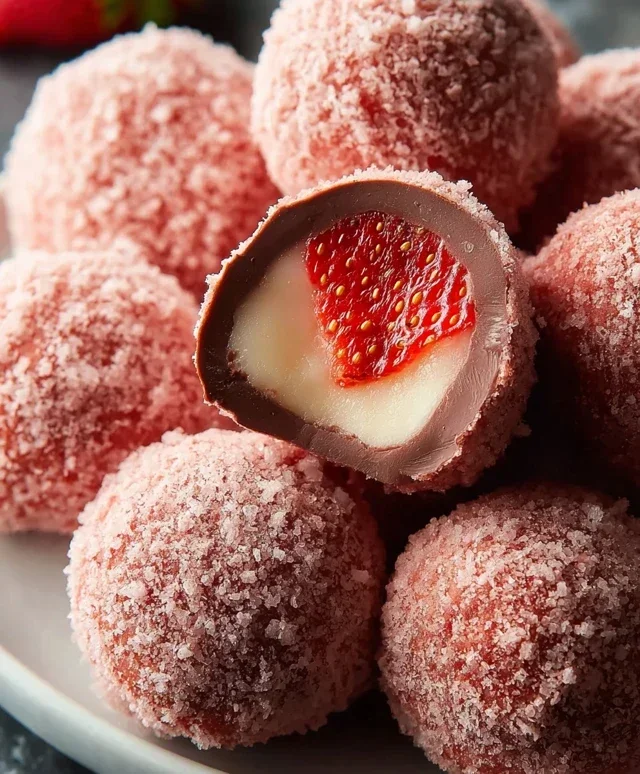
Easy Strawberry Truffles-Deliciously Sweet Dessert
Strawberry truffles are more than just a confection; they are tiny bursts of pure joy, little spheres of happiness that promise an experience like no other. Imagin extracte the vibrant sweetness of ripe strawberries, perfectly balanced with rich, decadent chocolate – that’s the magic held within each of these exquisite delights. We absolutely adore strawberry truffles because they manage to be both intensely flavorful and delightfully delicate. They’re the perfect sweet ending to a special meal, a thoughtful homemade gift, or simply a well-deserved treat for yourself. What truly sets these strawberry truffles apart is the effortless elegance they bring to any occasion. They’re surprisingly simple to make at home, transforming humble ingredients into something truly spectacular that will impress everyone who tastes them. Get ready to fall in love with this divine creation!
Strawberry Truffles
Welcome to a delightful journey into the world of homemade sweets! Today, we’re crafting something truly special: Strawberry Truffles. These little gems are a burst of fresh strawberry flavor, enveloped in smooth, creamy white chocolate. They are surprisingly easy to make and are guaranteed to impress your friends and family, or simply be a wonderful treat for yourself. The beauty of these truffles lies in their simplicity and the incredible taste that belies their straightforward preparation. Imagin extracte a delicate, melt-in-your-mouth experience with that unmistakable hint of sweet strawberries – that’s exactly what we’re going to achieve.
These truffles are perfect for any occasion. They make elegant additions to a dessert platter, thoughtful handmade gifts, or a delightful pick-me-up on a quiet afternoon. The vibrant pink hue, achieved with just a tiny touch of food coloring, adds a festive and appealing visual element. Let’s dive in and create some edible magic!
Ingredients:
Crafting Your Strawberry Truffles: Step-by-Step
Now for the fun part! Get ready to transform these simple ingredients into exquisite treats.
Phase 1: Melting the Base
The foundation of our delicious truffles is a smooth, luscious white chocolate ganache. This is where the magic begin extracts.
1. First, we need to melt our white chocolate and butter together. The best and most gentle way to do this is over a double boiler. You can create a makeshift double boiler by placing a heatproof bowl (glass or stainless steel works wonderfully) over a saucepan filled with about an inch or two of simmering water. Ensure the bottom of the bowl does not touch the water. Add your 1 cup of white chocolate chips and ¼ cup of unsalted butter to the bowl. Stir them gently and consistently as they begin extract to melt. Be patient; white chocolate can be a little finicky and can scorch if the heat is too high or if you rush the process. You’re looking for a smooth, glossy mixture with no lumps of chocolate or butter remaining. Once melted and combined, remove the bowl from the heat.
2. Next, we’ll incorporate the liquids to create our ganache. Gently stir in the 3 tablespoons of heavy whipping cream. Continue to stir until the cream is fully incorporated into the white chocolate mixture and the ganache is smooth and velvety. At this stage, it’s crucial to maintain a consistent stirring motion to ensure everything emulsifies properly and you don’t end up with a greasy or separated ganache. The warmth of the melted chocolate will help the cream blend seamlessly.
Phase 2: Infusing Flavor and Color
This is where we add those signature strawberry notes and a beautiful rosy hue.
3. Now it’s time to add our flavorings and color. To the smooth ganache, carefully add ½ teaspoon of strawberry extract and ¼ teaspoon of vanilla extract. These extracts are concentrated, so measuring accurately is important for achieving the perfect balance of flavors. Stir them in thoroughly until they are completely distributed throughout the mixture. Following that, add just 1 drop of pink food coloring. I recommend starting with a single drop because you can always add more if you desire a deeper color, but you can’t easily take it away. Stir gently until the color is uniform, creating a lovely pnon-alcoholic ale pink hue. The goal is a subtle, inviting color that hints at the strawberry within.
Phase 3: Chilling and Shaping
Patience is key here, as chilling is essential for the truffles to firm up enough to be handled.
4. This is a critical step for successful truffle making: chilling. Cover the bowl containing your ganache with plastic wrap, pressing the wrap directly onto the surface of the ganache. This prevents a skin from forming. Place the covered bowl in the refrigerator for at least 2-3 hours, or until the mixture is firm enough to scoop and roll. You want it to be solid but not rock-hard. If it’s too soft, it will be messy to work with; if it’s too hard, it will be difficult to shape. The chilling process allows the fats in the chocolate and butter to solidify, giving you that perfect truffle consistency.
Phase 4: Rolling and Finishing
The final touches that transform the chilled ganache into perfect little spheres.
5. Once your ganache is perfectly chilled and firm, it’s time to roll! You can use a small cookie scoop or a spoon to portion out small amounts of the mixture. Work with one portion at a time, as the warmth of your hands will start to soften the ganache. Roll each portion into a smooth, bite-sized ball between your palms. Don’t worry if they aren’t perfectly round; a rustic charm can be quite lovely! Place the rolled truffles on a parchment-lined baking sheet as you work. Once all your truffles are rolled, you can either serve them as is, or for an extra touch of sweetness and a smoother finish, gently toss them in the ¼ cup of powdered sugar. This light coating adds a delicate sweetness and a beautiful matte finish. For a more decorative touch, you could also consider dipping them in melted chocolate or rolling them in finely chopped nuts or sprinkles. However, a simple dusting of powdered sugar is wonderfully elegant and lets the strawberry flavor shine.
Allow the finished truffles to set for a few minutes before serving. They are best enjoyed at room temperature, allowing the flavors and creamy texture to be fully appreciated. Store any leftovers in an airtight container in the refrigerator for up to a week. Enjoy your homemade Strawberry Truffles!

Conclusion:
There you have it! A simple yet incredibly elegant recipe for Strawberry Truffles that are sure to impress. The magic lies in the perfect balance of sweet, slightly tart strawberries and rich, decadent chocolate. These truffles are not only a delightful treat for yourself but also a show-stopping gift for any occasion. Whether you’re a seasoned baker or just starting out, this recipe is wonderfully forgiving and yields professional-looking results. Imagin extracte the delight on someone’s face when they bite into these melt-in-your-mouth morsels of fruity chocolatey goodness!
I encourage you to give these Strawberry Truffles a try. They’re perfect for a special dessert, a thoughtful homemade gift, or even just a little self-indulgence. Don’t be afraid to experiment with the variations I’ve suggested – perhaps a swirl of white chocolate or a dusting of freeze-dried strawberry powder for extra flair. Serve them chilled alongside a cup of coffee, a glass of cbeef hampagne, or as a sweet ending to a romantic dinner. The possibilities are as endless as your creativity!
Frequently Asked Questions:
How do I store my Strawberry Truffles?
For the best texture and flavor, store your Strawberry Truffles in an airtight container in the refrigerator for up to one week. Allow them to come to room temperature for about 15-20 minutes before serving for optimal melt-in-your-mouth experience.
Can I use fresh strawberries instead of freeze-dried?
While this recipe is designed for the intense flavor and low moisture content of freeze-dried strawberries, you can attempt to use fresh ones. However, you’ll need to reduce the fresh strawberry puree significantly to remove excess water. Be cautious, as too much moisture can cause the chocolate to seize. The result will also be a softer truffle and the flavor might be less concentrated.
What other coatings can I use for these truffles?
Beyond the classic chocolate coating, feel free to get creative! You could roll them in finely chopped nuts like pistachios or almonds, dip them in melted white chocolate for a contrasting color, or even dust them with cocoa powder or a sprinkle of edible glitter for extra sparkle.
Strawberry Truffles
Decadent strawberry truffles made with white chocolate, cream, and a hint of strawberry and vanilla flavor. These no-bake treats are perfect for any occasion.
Ingredients
-
1 cup white chocolate chips
-
1/4 cup unsalted butter
-
3 tablespoons heavy whipping cream
-
1/2 teaspoon strawberry extract
-
1/4 teaspoon vanilla extract
-
1 drop pink food coloring
-
1/4 cup powdered sugar
Instructions
-
Step 1
Melt white chocolate chips and unsalted butter in a heatproof bowl set over a saucepan of simmering water, stirring until smooth. -
Step 2
Remove from heat and stir in heavy whipping cream, strawberry extract, vanilla extract, and pink food coloring until well combined and uniformly colored. -
Step 3
Cover the bowl with plastic wrap and refrigerate for at least 1 hour, or until firm enough to roll. -
Step 4
Place powdered sugar in a shallow dish. -
Step 5
Scoop small portions of the truffle mixture and roll them into balls with your hands. Immediately roll each ball in the powdered sugar until evenly coated. -
Step 6
Place the coated truffles on a parchment-lined baking sheet and refrigerate for another 30 minutes to set.
Important Information
Nutrition Facts (Per Serving)
It is important to consider this information as approximate and not to use it as definitive health advice.
Allergy Information
Please check ingredients for potential allergens and consult a health professional if in doubt.