Super Cute Daisy Cupcakes Recipe- Easy & Adorable Treats
Super Cute Daisy Cupcakes are an absolute delight to both make and devour! Imagin extracte a burst of sunshine on a plate, perfect for brightening any occasion. These aren’t just any cupcakes; they’re miniature works of art that bring smiles to faces of all ages. Everyone loves them because they capture that simple, cheerful beauty of a daisy, transforming a classic treat into something truly magical. What makes these Super Cute Daisy Cupcakes so special is their effortless charm. The combination of a tender, fluffy cake base and a visually stunning, edible daisy decoration creates a dessert that’s as pleasing to the eye as it is to the palate. Whether you’re celebrating a birthday, hosting a garden party, or just looking for a way to spread a little joy, these delightful treats are guaranteed to be a showstopper. Get ready to embrace your inner baker and create something truly unforgettable.
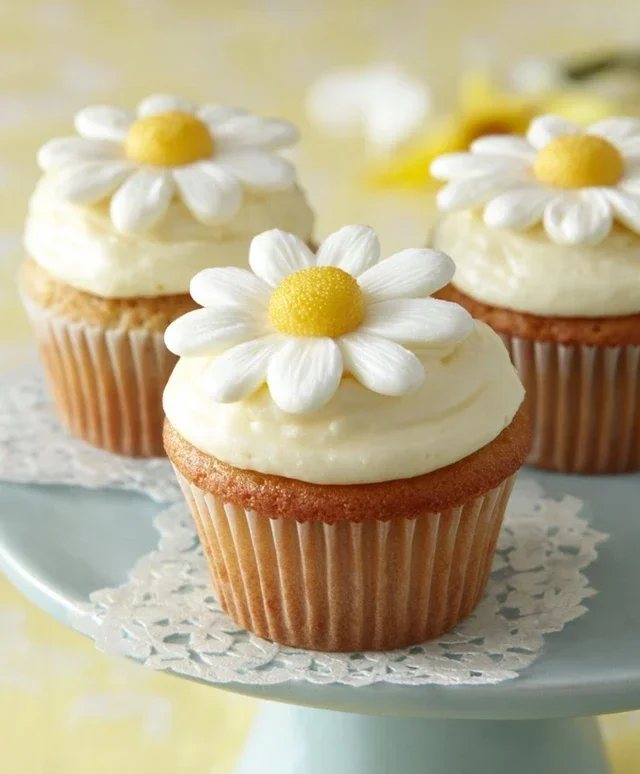
Super Cute Daisy Cupcakes
Get ready to brighten your day with these absolutely adorable Super Cute Daisy Cupcakes! These little delights are perfect for parties, special occasions, or just when you need a burst of sunshine in your life. The fluffy vanilla cake is topped with a creamy, luscious cream cheese frosting, all transformed into cheerful daisies with just a touch of food coloring. They’re deceptively simple to make, but the visual impact is huge. Let’s dive into creating these little edible masterpieces!
Ingredients:
For the Buttermilk Substitution:
If you don’t have buttermilk on hand, don’t worry! You can easily make your own. For every 140 ml of buttermilk needed, take 140 ml of regular milk (whole or 2%) and stir in 1 tablespoon of white vinegar or lemon juice. Let it sit for 5-10 minutes until it looks slightly curdled. This will give you the perfect tangy liquid for our cake.
Making the Daisy Cupcakes:
Step 1: Prepare Your Cake Batter
First things first, let’s get our cake batter ready. Preheat your oven to 180°C (160°C fan/350°F/Gas Mark 4) and line a 12-cup muffin tin with cupcake liners. In a large bowl, cream together the 120g of soft unsalted butter and 150g of granulated sugar until the mixture is light and fluffy. This process, known as creaming, incorporates air into the butter and sugar, which is crucial for a tender cake crum extractb. You can use an electric mixer for this, or a sturdy whisk if you’re feeling energetic. Next, beat in the 2 eggs, one at a time, ensuring each egg is fully incorporated before adding the next. Stir in 1 tablespoon of vanilla extract for that classic sweet aroma. In a separate bowl, whisk together the 160g of all-purpose flour, 20g of corn starch, 1 tsp of baking powder, ½ tsp of baking soda, and 1 pinch of salt. The corn starch helps to make the cake extra tender and moist. Gradually add the dry ingredients to the wet ingredients, alternating with the 140 ml of buttermilk. Begin extract and end with the dry ingredients. Mix until just combined; be careful not to overmix, as this can lead to a tough cake. Overmixing develops the gluten in the flour too much. You want a smooth, luscious batter.
Step 2: Baking the Cupcakes
Spoon the batter evenly into your prepared cupcake liners, filling each about two-thirds full. This will allow the cupcakes to rise without overflowing. Place the muffin tin in the preheated oven and bake for 20-25 minutes, or until a wooden skewer or toothpick inserted into the center of a cupcake comes out clean. The aroma of baking vanilla will start to fill your kitchen – a sure sign of deliciousness! Once baked, let the cupcakes cool in the tin for about 5-10 minutes before transferring them to a wire rack to cool completely. It’s very important that they are fully cooled before frosting, otherwise, the frosting will melt and slide right off.
Step 3: Crafting the Cream Cheese Frosting
Now for the star of the show: the frosting! In a large bowl, beat together the 160g of room-temperature cream cheese and 100g of soft unsalted butter until smooth and creamy. Make sure your cream cheese and butter are truly at room temperature; this is essential for achieving a lump-free frosting. If they are too cold, they won’t incorporate properly. Gradually add the 300g of icing sugar, about a third at a time, beating well after each addition until it’s fully combined and the frosting is light and fluffy. Stir in 1 teaspoon of vanilla extract for an extra layer of flavor. You should have a beautiful, thick frosting that’s perfect for piping.
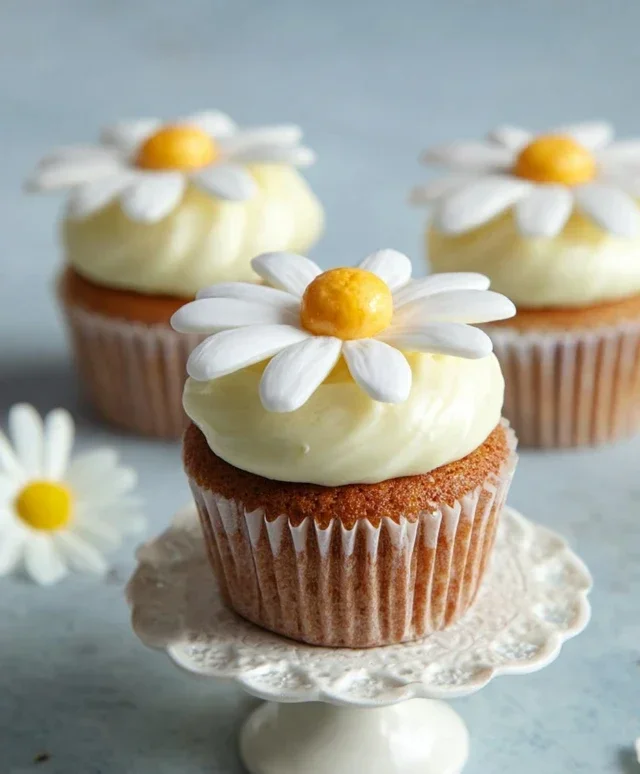
Step 4: Decorating the Daisy Faces
This is where the magic happens and our cupcakes transform into cheerful daisies! Divide your cream cheese frosting into three separate bowls. Leave one bowl white for the daisy petals. In the second bowl, add a few drops of yellow food coloring and mix until you achieve a vibrant yellow for the daisy centers. In the third bowl, add a few drops of orange food coloring and mix well. You can adjust the intensity of the colors by adding more or fewer drops. Fit piping bags with a round tip (for the centers) and a star tip (for the petals). If you don’t have piping bags, you can spoon the frosting into ziploc bags and snip off a corner.
Step 5: Assembling Your Daisy Cupcakes
To create the daisy effect, start by piping a small circle of yellow frosting in the center of each cooled cupcake. This will be the heart of your daisy. Next, using a star tip, pipe white frosting petals around the yellow center, radiating outwards. Don’t be afraid to make them a little imperfect; real daisies aren’t perfectly uniform! For a little extra detail and a subtle gradient, you can use the orange frosting to add a touch of color to the edges of some of the petals, or even pipe a tiny orange dot in the very center of the yellow circle. Continue this process for all your cupcakes until you have a garden of adorable daisy cupcakes. You can also use a spatula to create a petal effect if you don’t have piping tips. Simply spread the white frosting in petal shapes around the yellow center. These cupcakes are best served at room temperature, so allow them to sit out for about 30 minutes before enjoying their cuteness and deliciousness!
Conclusion:
And there you have it! These Super Cute Daisy Cupcakes are not just a treat for the taste buds, but a genuine joy to create and behold. Their simple yet charming design makes them perfect for any occasion, from a whimsical birthday party to a delightful afternoon tea. The fluffy vanilla cake combined with the creamy, sweet buttercream frosting creates a delightful flavor profile that appeals to both kids and adults. I truly hope you’ll give this recipe a try – it’s such a rewarding and fun baking experience!
These little daisy delights are incredibly versatile. Serve them as is for a burst of sunshine, or dress them up further with edible glitter for extra sparkle. They are fantastic as a centerpiece for a dessert table, or individually packaged for party favors. For a fun twist, consider adding a touch of lemon zest to the cake batter for a brighter flavor, or experiment with different colored sprinkles for the centers of your daisies.
Frequently Asked Questions:
Can I use a different cake flavor?
Absolutely! While the vanilla cake is a classic, feel free to substitute your favorite cake recipe. Chocolate, lemon, or even a strawberry cake would be delicious and make for beautiful, albeit different, daisy cupcakes.
How long do these cupcakes last?
Once decorated, these cupcakes are best enjoyed within 2-3 days. Store them in an airtight container at room temperature. If you live in a very warm climate, you might consider refrigerating them, but bring them back to room temperature before serving for the best texture.
What if I’m not good at piping frosting?
Don’t worry at all! You can achieve a lovely daisy effect without perfect piping skills. Try using a large round tip for the petals and a smaller round tip for the center, or even just a butter knife to spread the frosting smoothly and then dot it with yellow sprinkles for the center. The charm of these Super Cute Daisy Cupcakes lies in their homemade appeal!
Super Cute Daisy Cupcakes
Adorable and delicious vanilla cupcakes with a vibrant daisy frosting, perfect for any celebration.
Ingredients
-
140 ml Buttermilk
-
120 g Soft unsalted butter
-
150 g Granulated sugar
-
2 Eggs
-
1 tbsp Vanilla extract
-
160 g All purpose flour
-
20 g Corn starch
-
1 tsp Baking powder
-
½ tsp Baking soda
-
1 pinch Salt
-
160 g Cream cheese
-
100 g Soft unsalted butter
-
300 g Icing sugar
-
1 tsp Vanilla extract
-
Yellow food coloring
-
Orange food coloring
Instructions
-
Step 1
Preheat oven to 175°C (350°F). Line a 12-cup muffin tin with paper liners. -
Step 2
In a large bowl, cream together the soft unsalted butter and granulated sugar until light and fluffy. Beat in the eggs one at a time, then stir in the vanilla extract. -
Step 3
In a separate bowl, whisk together the all-purpose flour, corn starch, baking powder, baking soda, and salt. Gradually add the dry ingredients to the wet ingredients, alternating with the buttermilk, beginning and ending with the dry ingredients. Mix until just combined, being careful not to overmix. -
Step 4
Divide the batter evenly among the prepared muffin cups, filling each about two-thirds full. Bake for 18-20 minutes, or until a toothpick inserted into the center comes out clean. -
Step 5
While the cupcakes cool, prepare the frosting. In a large bowl, beat the cream cheese and soft unsalted butter until smooth. Gradually add the icing sugar and vanilla extract, beating until light and fluffy. -
Step 6
Divide the frosting into three portions. Color one portion yellow, one orange, and leave one white. To create the daisy effect, frost the cupcakes using the white frosting as the base, then pipe yellow centers and orange petal tips.
Important Information
Nutrition Facts (Per Serving)
It is important to consider this information as approximate and not to use it as definitive health advice.
Allergy Information
Please check ingredients for potential allergens and consult a health professional if in doubt.